
Do you wish to join the race for NFT Discord Server? Are you looking for ways to create an NFT Discord Server? Do not worry. We present to you a complete guide on how to create an NFT Discord Server. Just follow the instructions given in this article below to get started.
Discord is a popular communication app used for chatting and making audio and video calls. It has over 150 million active users from all over the world. What was initially started as a networking platform is now predominantly famous among the online gaming community, where gamers create specific servers to communicate among themselves. Recently, NFT (Non-Fungible Tokens) traders have taken an interest in Discord, as it offers a great platform to form communities and share current information. Users can create an NFT Discord Server as a community for users who actively collect, trade, sell and participate in NFTs. Users can start their own NFT Discord Servers and invite other interested users to their channels dedicated to sharing information specifically on NFTs.
You can create an NFT Discord Server by following the instructions given in this article below.
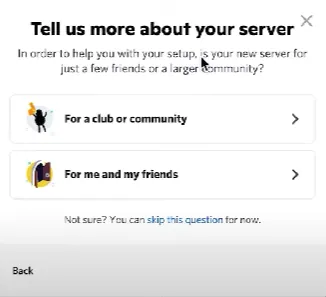
Discord.com > Login > Green + Sign > Create My Own > For a Club or Community > Server Name > Create > Profile Picture > Save
Let’s get started and create your very own NFT Discord Server!
How To Create An NFT Discord Server?
Discord is not just a gamer’s platform. It is the hub for YouTubers and social influencers who make use of the platform to directly connect with millions of users on their servers. This has attracted NFT investors, who wish to create an NFT Discord Server. If you are one such eager user, wishing to create an NFT Discord Server, you can follow the instructions given below to achieve your feat.
Discord.com > Login > Green + Sign > Create My Own > For a Club or Community > Server Name > Create > Profile Picture > Save
Step 1 – Go to www.discord.com
Step 2 – Tap to Open Discord on your browser.
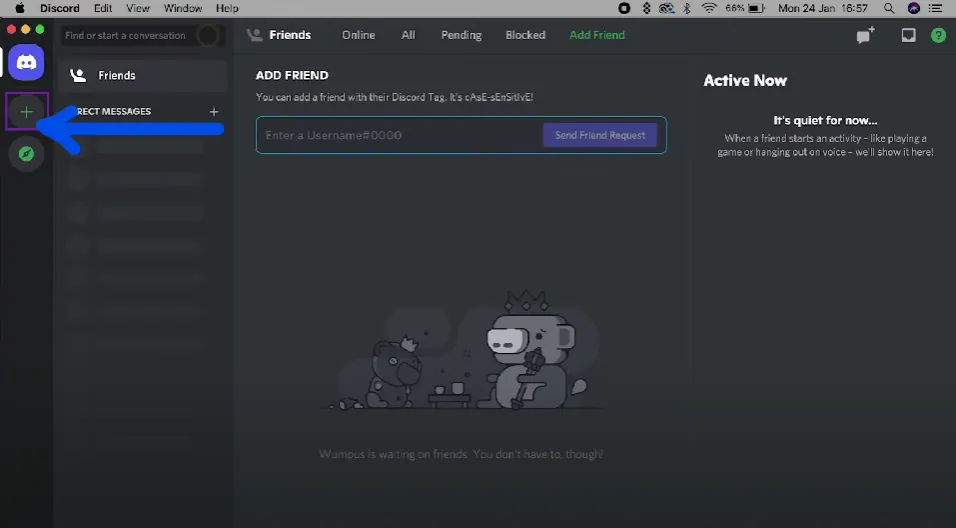
Step 3 – Enter your credentials to login to your account.
Step 4 – Click on the Green ‘+’ sign on the left panel.
Step 5 – Tap to ‘Create My Own’.
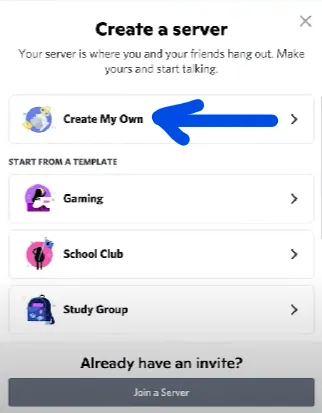
Step 6 – Select ‘For a club or Community’ on the next pop-up.
Step 7 – Enter the name of your server. Make sure that it is related to NFT.

Step 8 – Upload a Profile picture relevant to NFTs.
Step 9 – Tap to Create.
We have now successfully created an NFT Discord Server. You will be able to edit the Profile picture and the name of your NFT Discord server at any time.
How To Create an NFT Discord Server Roles?
Now that we have created an NFT Discord server, it is time to establish server roles.
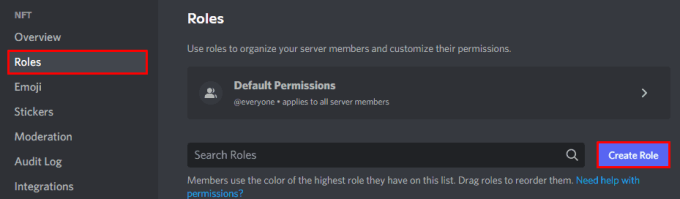
Step 1 – Click on the Title of your server to access Settings.
Step 2 – Tap to switch to Roles page.
Step 3 – Click to Create Role.
You should have the following roles in your NFT Discord Server,
- Admins
- Moderators
- Developers
- Bots
- VIP
- Artists
- Members
You can customize the roles by choosing from a list of available templates. Remember that you have to create an NFT Discord Server, make sure that you personalize the roles to best suit your NFT server.
Ensure that you choose the server admins, moderators, and developers very carefully, as they represent your NFT Discord Server. Make sure that they understand the trade that they are dealing with, as they are the essence of your NFT server.
How to Create NFT Discord Server Channels?
After you create an NFT Discord Server, you can further enhance it by adding server channels. All channel permissions will be automatically synced to the relevant category when you create an NFT Discord Server. You can choose to clone it to an existing channel to have the same permissions as found in the original channel.
Follow the instructions given below to create an NFT Discord Server.
Step 1 – Right click on the side panel on your Discord server.
Step 2 – Tap on Create Channel.
Step 3 – Select the type of your channel.
Step 4 – Enter the name of your channel.
Step 5 – Tap to Create Channel.
Now we have successfully created an NFT Discord Server with in-built channels. You can include the following channels in your server.
- General
- Owners
- Rules
- Roadmap
- About
- Announcements
- FAQs
How To Enable Community On Discord?
Do you want to further grow your NFT Discord server community? You can make some basic changes to the Discord server settings and enable the community feature to access additional channel features. You can enable the NFT Discord server community on Discord by the following steps.
Step 1 – Tap to open the Server settings.
Step 2 – Click Enable Community on the side panel.
Step 3 – Tap to Get Started.
Step 4 – Enable the safety check.
Step 5 – Select the rules and updates on your channels.
Step 6 – Tap to adjust all the necessary settings.
Step 7 – Tap to agree.
Step 8 – Click on Finish Setup.
Step 9 – Enter your server description.
Step 10 – Tap the Save the changes made.
Enable Membership Screening
Do you wish to have only genuinely interested members in your NFT Discord server? Then, when you create an NFT Discord Server, you can add an extra layer to screen unwanted members, who do not comply with the terms and conditions of the server. In membership screening, all users will have to read through the rules and accept the terms, before gaining access to your NFT Discord Server.
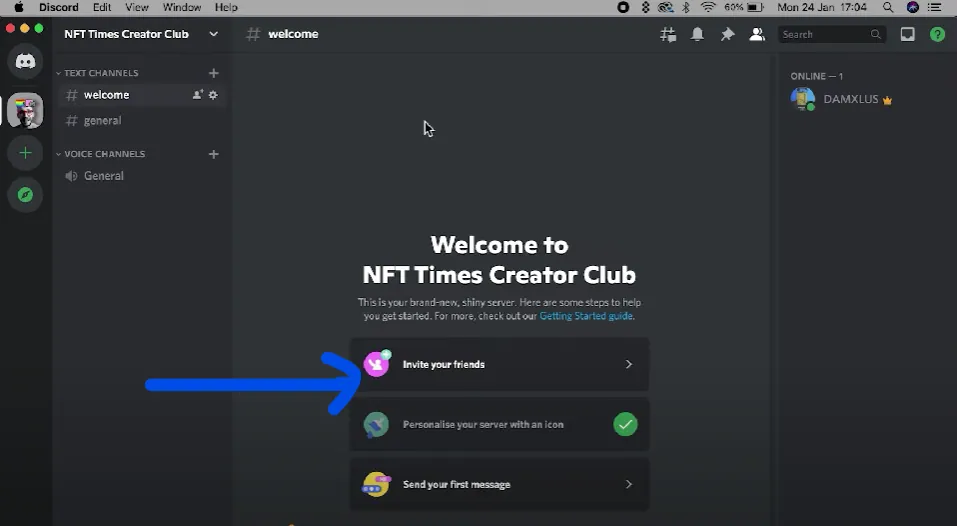
Add NFT Discord Server Welcome Screen
The welcome screen is the very first screen all members will see when they enter your NFT Discord server. Make sure that you enter a short and crisp description of your NFT Discord server. You can add any two or three channels to it, and represent it with an emoji which helps members to easily recognize their NFT Discord server.
How To Invite Members To Your NFT Discord Server?
The final and most important part when you create an NFT Discord server is to send server invite links to invite members to your channels. You can choose to add the invite link to your social profiles, through which new members can join your NFT Discord Server.
Step 1 – Open Discord on your web browser.
Step 2 – Right-click on your NFT Discord channel.
Step 3 – Tap to Invite People.
Step 4 – Click on the Edit Invite link.
Step 5 – Select your link to Never Expire, without any limit.
Step 6 – Wait for the app to generate a link.
Step 7 – Select the link to copy it at the bottom of the page.
You now know how to create an NFT Discord Server and invite members to join it.
Wrap Up
The world we live in is constantly evolving. It is our responsibility to keep up with its pace. If you want to grow with the world by trading in NFTs and crypto currencies, it is only possible to do so as a community. We can now create an NFT Discord server by following the instructions given in this article and grow together as a community and try to keep up with the rest of the world.
Frequently Asked Questions
Q1 How Do NFT Discord Servers Work?
NFT Discord server allows users to share important information. Users can create an NFT Discord server for those who actively collect, trade, sell and participate in NFTs. One can start their own NFT Discord server and invite other interested users to their channel which is dedicated to posting information specifically on NFTs.
Q2 Do NFT Projects Need A Discord?
It is not necessary for all NFT projects to have a Discord server. However, creators of the NFT Discord server can add new channels and assign roles to do better NFT Projects on Discord.
Q3 How Do I Make A Discord Server For NFT?
To make a Discord server for NFT, open the Discord official website and login to your Discord account. Next, you must click on the ‘+’ sign on the left side and then on Create My Own. Now, select For a Club or Community and then write the server name and click on create. At last, upload the profile picture and save it.