
Everything on Google Docs seems like a piece of cake unless you stumble on a feature that you don’t know how to use. If you know how to use it, then do you want a quick fix to your problem that you believe Google Docs can’t solve? However, the latter is rarely the troublesome case! The reason for that is – “when features don’t work, we use tricks!” The same is the case with vertical text Google Docs! People are sweating over how to rotate text in Google Docs but little do they know that there’s nothing complicated in the process! One way and your problems are solved!
Google Docs has become an indispensable part of our life where we can share and draw on any doc with absolute ease! Whether in school or professional environment, google docs has always come out as our savior with its varied options! Old Microsoft word applications have been rendered useless as many people are now turning to Google Docs.
Well, to find out vertical text google docs or how to type vertically in google docs and how to rotate text in google docs table, here is what you have to do. To rotate text in Google docs, you can insert the drawing and then rotate it. To do so go to insert > Drawing > Insert the text Box > Type in the Text > Insert the drawing to the docs > rotate it.
Nevertheless, Google Docs isn’t all-encompassing as it certainly needs an up-gradation when it comes to Vertical text! Ideally, there’s no function specifically designed to let you rotate your text in Google Docs sideways but there are various tricks by which you can do the same! So if you’ve been long wondering about “How to rotate text in Google Docs?” and need a quick solution, here lies your all answers!
Google Docs has various functions and if you get a knack for it, you’ll be a pro in a matter of seconds! So let’s get you acquainted with some features of Docs that you never knew could help you out! Come let’s learn more about rotate text in Google Docs.
How To Rotate Text In Google Docs?
We are here to tell you how to get vertical text in Google Docs. To rotate text in Google Docs, you can insert the drawing and then rotate it. To do so go to insert > Drawing > Insert the text Box > Type in the Text > Insert the drawing to the docs > rotate it.
There’s no specific feature when it comes to rotating your selected text on Google Docs. the alignment options in Google Docs are restricted to center, left, and right with no option that can make your text in vertical format. However, this doesn’t mean you can’t do the job!
You can make your text vertical in Google Docs in four easy ways. One of these will make your text vertical letter by letter and the other will let you rotate your written text in vertical format. Let’s see how to type vertical text in google docs table!
4 Different Ways To Rotate Text Vertical In Google Docs
These are four easy hacks that will let you organize your Google Doc text in vertical format. The first one of them is extremely easy and your mind might already have tried this out on your own! Other ways are quite simple too where you just have to make use of other options available like table or drawing.
Here are the four hacks to make text vertical in google docs!
- Type your text vertically
- Type your text in a single-column table
- Size orientation in drawing canvas
- Text rotation in drawing canvas
1. Type Your Text Vertically: Rotate Your Text Vertically In Google Docs

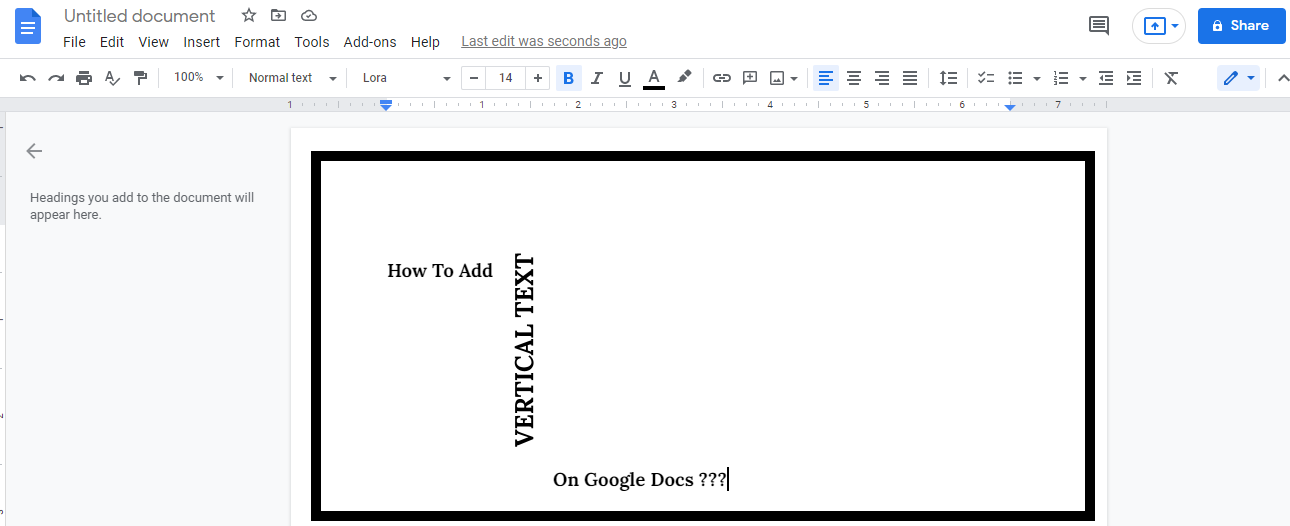
The first and foremost way by which you can make text vertical in Google Docs is by actually typing your text letter by letter in your selected Doc file. Here are the ways in which you can Google Docs vertical text.
Step 1: Open Google Docs on Chrome or any browser you use and then enter the docs file you want to work on.
Step 2: Once opened, move your cursor anywhere in the document and reach the place where you want to add the vertical text.
Step 3: Type the first letter of the text and then press enter to add the other just afterward the first one.
Step 4: Keep typing letter by letter to complete the text you want to add. Look at the image for reference.
Step 5: Once your text is ready, select the whole text by pressing the CTRL + Shift + C + Down-arrow key.
Step 6: Once selected, go to the menu bar and select the “line & paragraph spacing” option, and reduce the spacing of the text. Reduce it to single or you can also customize it according to your needs.
Step 7: Once you have reduced line spacing, your vertical text is how you want it to be.
You can add other text in front of your vertical text now but with some restrictions. You can not freely press enter after every line ends and thus have to keep molding your text according to your vertical text. Thus, this option isn’t better than other options on the list.
2. Rotate Your Text By Typing in Single Column Table
Another hack to rotate text in Google Docs is by adding the text letter by letter on a single column table. Here’s how to know how to make text vertical in google docs table.
Step 1: Open Google Docs on Chrome or any browser you use and then enter the docs file you want to work on.
Step 2: Move your cursor to the place you want to add vertical text.
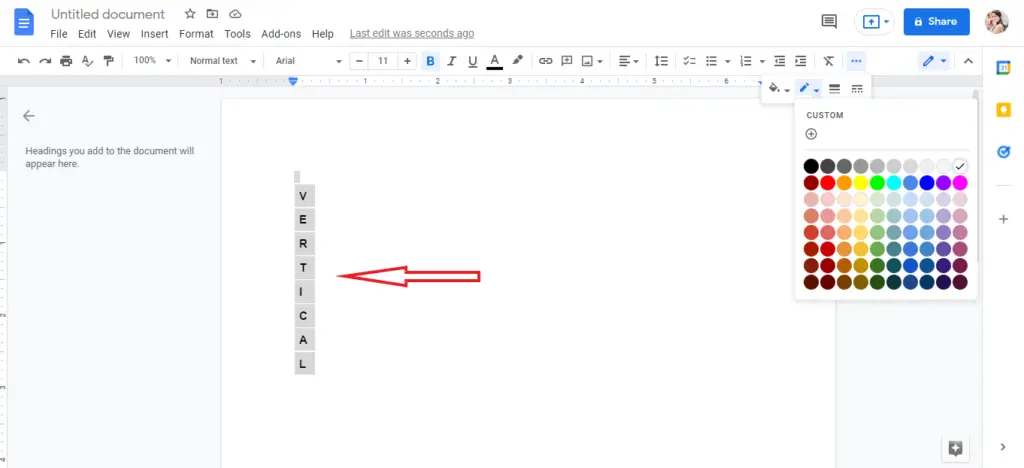
Step 3: Navigate your cursor to the Menu bar and open the insert option. Once you click on insert, go to the table and add a single column table according to the alphabet in your text.
Step 4: Once the table is added, adjust the width of the table and make it wide enough to accommodate letters only (look at the picture for reference). Once you have done that, type your text letter by letter there. Your text will start taking the vertical form, but the lines or borders of the table are a bit distracting, aren’t they? Remove them!
Step 5: You can’t remove the borders of your table, but you can certainly reduce its width. To reduce the width of your table, select the table and go to the option on the menu bar to reduce width.
Step 6: Select the width as 0 and your table lines won’t be visible that way. You can also make your table borders disappear by changing the color of the border to white or your page’s background color.
Step 7: This way, only your letters will appear vertical and not the table borders.
This is how you can make your text appear vertical letter-by-letter with the help of a single-column table.
3. Rotate Your Text On Google Docs By Using Size Orientation In Drawing Canvas
Another way in which you can make your text vertical in Google Docs is with the help of the drawing option! Let’s see how you can do that!
Step 1: Open Google docs on Chrome or any browser you use and then enter the docs file you want to work on.
Step 2: Place your cursor where you want to add your vertical text and click.
Step 3: Once you have decided on the place where you want to add your vertical text, navigate your cursor to the menu bar.
Step 4: On the Menu bar, click on insert and then choose the drawing option. Once you have clicked on the drawing option, “+New” will appear. Click on this.
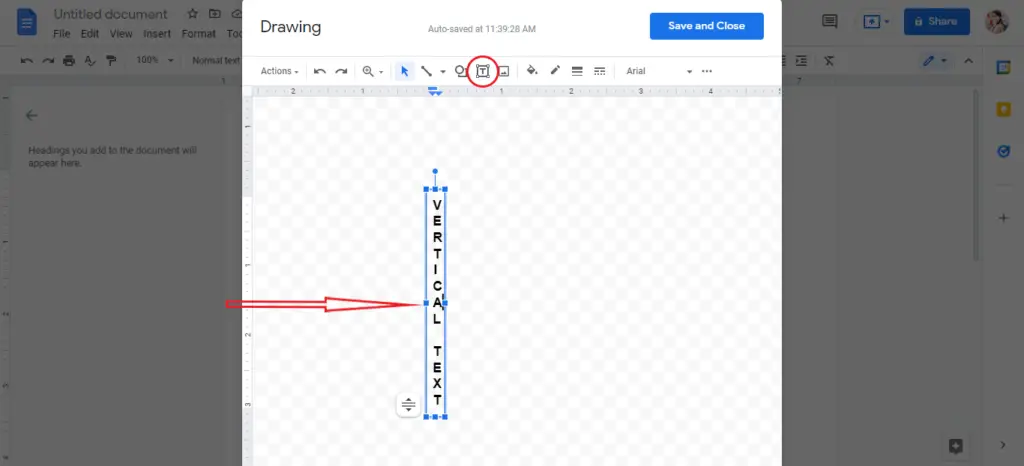
Step 5: After clicking on “+ New”, a drawing canvas will open. Here, click on the “T” or insert the text box option.
Step 6: Once the text box appears on your drawing canvas, click on it and write your desired text in it.
Step 7: After typing the text, you can select it and orient it the way you want. You can also beautify your text by choosing a different font or text color by making use of the options in the menu bar of your drawing canvas.
Step 8: Once you’re satisfied with the way your text appears, drag the side anchors on your text box to reduce its size and make it vertical till only one letter stays at the top. Look at the image below for reference.
Step 9: After you have reduced the size of your text box to make it vertical, position it in a desirable manner so that it appears perfectly on your doc file.
Step 10: Once you’re done with the text, click on save and continue.
Step 11: After saving your text, the same will appear on your file at the point where you first set your cursor.
Step 12: To fix the position of your text, you can text wrap the vertical text by clicking on it and selecting the “position” option, and clicking on the“fix on page” option under it. Once you click on “fix on page”, your vertical text will not move until you change the settings again by selecting text wrapping.
This is a good way of adding google docs vertical text by using the drawing option. The vertical text following this way appears in a letter by letter format and if you don’t want that, keep reading. The next one will definitely become your go-to.
4. Text Rotation In Drawing Canvas
The most used and effective way of rotating text and making vertical text in Google Docs is by using this method. The process is halfway similar to the previous one you read with a few changes in between. Let’s see what it is and how you can do it!
Step 1: Open Google docs on Chrome or any browser you use and then enter the docs file you want to work on.
Step 2: Place your cursor where you want to add your vertical text and click.
Step 3: Once you have decided on the place where you want to add your vertical text, navigate your cursor to the menu bar.
Step 4: On the Menu bar, click on insert and then choose the drawing option. Once you have clicked on the drawing option, “+New” will appear. Click on this.
Step 5: After clicking on “+ New”, a drawing canvas will open. Here, click on the “T” or insert the text box option.
Step 6: Once the text box appears on your drawing canvas, click on it and write your desired text in it.
Step 7: After typing the text, you can select it and orient it the way you want. You can also beautify your text by choosing a different font or text color by making use of the options in the menu bar of your drawing canvas.
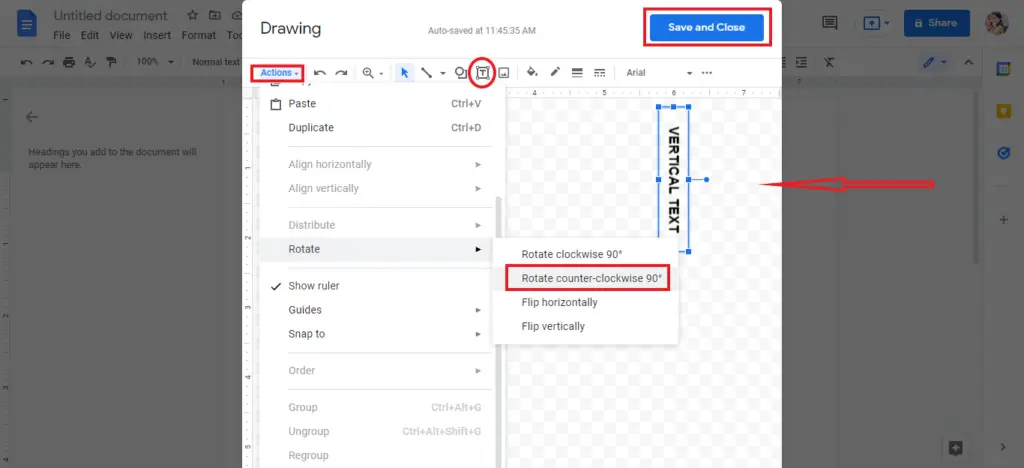
Step 8: Once you’re satisfied with the way your text appears, rotate the text!
Step 9: To rotate the text, click on the small round circle that appears on your text box and rotate it vertically. Press shift for precise vertical position.
Step 10: You can also rotate the text from the rotate option in the menu bar. On the menu bar, click on the option that appears as “action” and a list of other options will appear.
Step 11: Amidst the list of options, you can see the rotate option and this is what need to click on. Click on the rotate option and then click on “rotate clockwise 90 deg” or “rotate counter-clockwise 90 deg”.
Step 12: Select whichever option suits you best and then click on “save and continue”.
Step 13: Once you have saved your text, the same will appear on your doc file where you can assign a fixed position to your vertical text.
Step 14: To fix the position of your text, you can text wrap the vertical text by clicking on it and selecting the “position” option, and clicking on the“fix on page” option under it. Once you click on “fix on page”, your vertical text will not move until you change the settings again by selecting text wrapping.
So this was all about the ways in which you can make text vertical in your Google Docs! Now let’s see how you can make text vertical in the Google Docs table too!
How To Rotate Text In Google Docs Table: Vertical Text in Google Docs
Text can not be rotated directly in Google Docs, unlike the whole document or a particular page. The orientation options restrict some of the text positions and the most important one among them is “vertical text position”. Now, many times, the text title that we’re planning to write in a table is just too big that we have to change its position rather than formatting it to a smaller size.
However, as there’s no other option that directly specifies “change position vertically” or “rotates text” on the menu bar, we’re left puzzled. But, no worries! There’s a way in which you can actually rotate your text in a Google Docs table with ease! Let’s see how you can use google docs vertical text!
Step 1: Open your Docs file in Google Docs and insert a table.
Step 2: Click on the Insert tab in the menu bar and then select the table option and then go on and choose a table according to the rows and columns that you want.
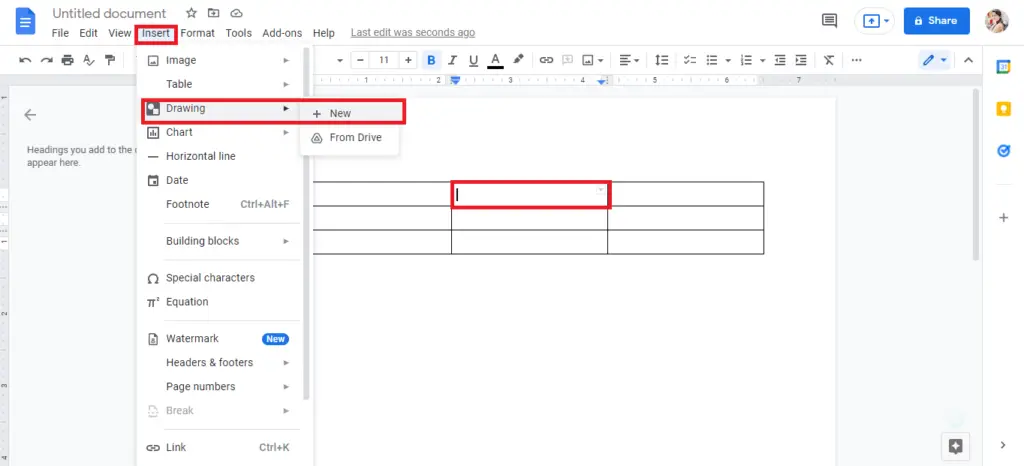
Step 3: Once you have added the table, place your cursor in the cell where you want your vertical text to be.
Step 4: Go to the Insert tab on the menu bar and then navigate to the “drawing” option. Once you catch sight of the drawing option, click on it, and then again various options like “+ New” and “Google Drive” will appear.
Step 5: Click on the “+ New” option and then a drawing canvas will open.
Step 6: On the drawing canvas, click on the “T” option on the menu bar and this will let you drag and insert a text box in the canvas.
Step 7: After adding the text box, write your text on it and then resize it by cutting the extra spaces by moving the anchors on the border of the text closer to the text. You can also change the alignment, font, and color of your text by selecting the text and adding whatever you want from the menu bar.
Step 8: Once you’re satisfied with your text’s appearance, rotate the text.
Step 9: Rotate your text by navigating your cursor to the menu bar and selecting the option “Action”. Another list of options will pop up and you have to look for the one that reads “rotate”.
Step 10: After finding the “rotate” option and clicking on it, choose “ rotate clockwise 90 deg” or “rotate counter-clockwise 90 deg”. Once you click on either of the two, your text will automatically rotate.
Step 11: click on save and continue once your text is vertical and you’ll see the same appear on the cell you placed your cursor at.
Step 12: Fix or adjust the position of your rotated text on the Google Docs table by clicking on any text wrapping option of your choice. After you’re done adjusting and fixing your text, your text will remain as it is in a vertical format!
That was all about how to rotate text in a table in google docs or how to change text direction in google docs table.
How to Type Horizontally in Google Docs?
Above we explained you how to type vertically in google docs, now we are here to tell you how to type horizontally in Google Docs. Follow the steps below if you want to know how to type sideways in google docs:
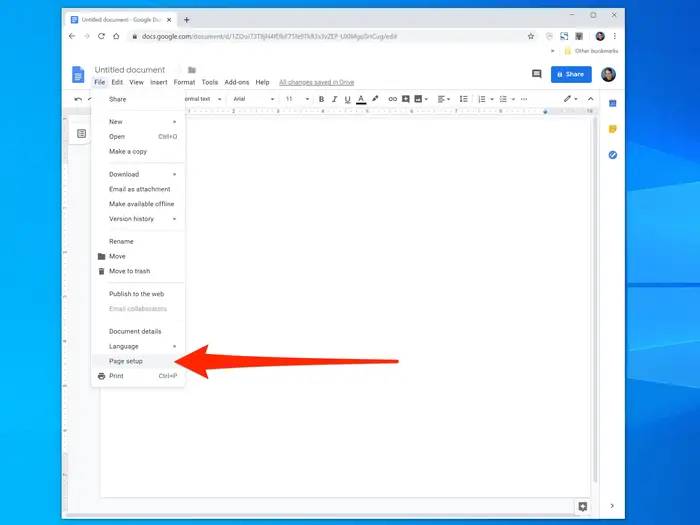
Step 1: Open a document in Google Docs using a web browser.
Step 2: Click “File,” and then click “Page setup” in the menu.
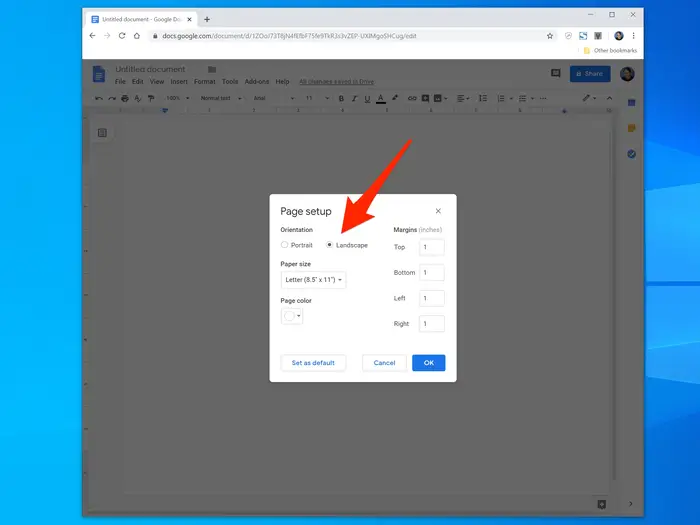
Step 3: In the Page setup dialog box, choose the orientation you want to use: Portrait or Landscape.
Step 4: When you’re done, click “OK.”
Wrapping Up
You can rotate and make your Google Docs table rotate text with ease even though the app seriously falls behind in that regard. To make your text appear vertical or to even rotate your text, you can make use of the “Drawing” option from the Insert tab in the menu bar. This was a guide on how to fix your text direction google docs according to your preference. Writing text on the drawing canvas and rotating it becomes easier than pasting the vertical content on your docs file from elsewhere!
Frequently Asked Questions
Q. Can You Turn Text Sideways In Google Docs?
You can not directly turn text sideways in Google Docs with help of a particular option as no such option or function exists in the first place. However, you can add a rotated, vertical text with the help of the drawing option. You can add your text on the drawing canvas in the Docs file itself and rotate the same to add a sideways text in your document.
Q. How Do You Rotate Something On Google Docs?
To rotate something on Google Docs, supposedly an image, you first have to select and click on it. After selecting and clicking on the image, you have to drag it to move it in the position or area you want. It is better to click on the shift button while you’re dragging your image as it helps move the same in a precise manner.
Q. How Do You Center Text Vertically and Horizontally in Google Docs?
To modify vertical cell alignment:
Select the cell or cells you want to align.
Right-click and select Table properties from the menu that appears.
The Table Properties dialog box appears. Click the Cell vertical alignment box.
Select the desired alignment.
Click OK. The text will realign.