

The best utilization of the iPad is reading and scrolling on a different website. Do you find something important and want to take a screenshot? Well, this article is for you. In this article, you will find methods of how to take screenshot on iPad Air 4. This will make your life easy so be with us.
If you are a new user of the Apple iPad Air 4 then taking screenshots may feel difficult for you. iPad lovers mostly use this gadget for reading, surfing, and scrolling on the internet. Many times they encounter something important that they want to store for the future by using screenshots.
Well, you can screenshot by assistive touch, by pressing the power button and volume up button together for a few seconds. That will help you to solve the problem of how to take screenshot on iPad Air 4.
How To Take Screenshot On iPad Air 4?
To take screenshots on iPad Air 4, there are some methods that will make taking the screenshot process easy. Users want to store some information that is relevant or important to them. Here are some methods mentioned below about how to take screenshots on iPad Air 4. So let’s move to the method without further ado.
Method 1: With The Help Of The Volume Up And Power Button
If you want to take screenshot on iPad Air 4 then you just have to follow these simple steps. Here is the solution to your problem of how to take screenshot on iPad Air 4.
Press And Hold Power and Volume Button For a Few Seconds> Screen Shot Done
Step 1: If you want to take a screenshot on your iPad Air 4 then unlock your iPad air.
Step 2: Then press the Power button and Volume up button together and hold for a few
seconds.
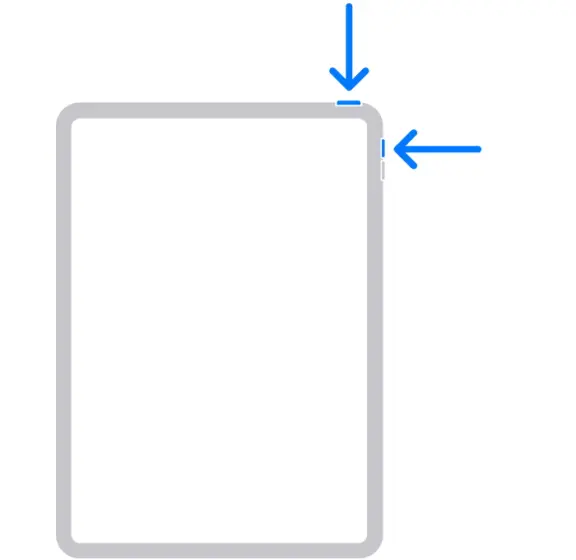
Step 3: The screen will blink and Screenshot will be taken without any time.
Step 4: Done.
Follow these easy steps that will help you to solve your problem of how to take screenshot on iPad Air 4.
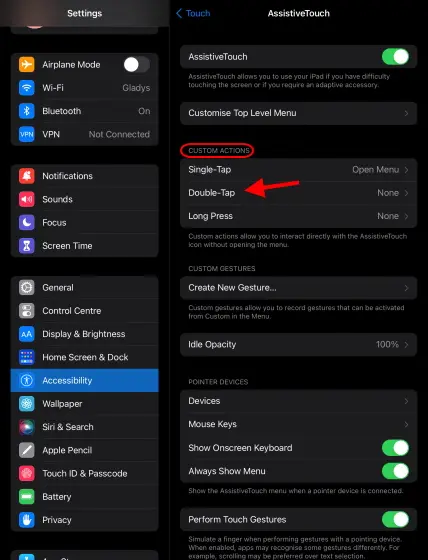
Method 2: By Setting Up Assistive Touch
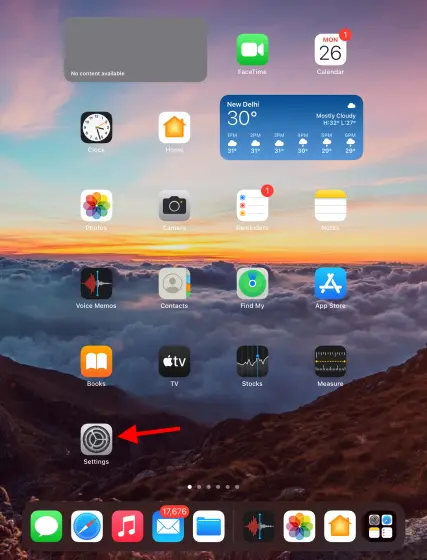
If you are more fond of touch rather than pressing buttons, well then there is one more method that will help you to take screenshot on your iPad Air 4. Apple has a function that allows gestures to be performed easier with assistive touch. So it’s going to be pretty easy for you to take a screenshot on iPad Air 4. To enable the assistive touch on your iPad air 4 follow these simple steps that will make the process easy.
Step 1: Go to your iPad’s settings.
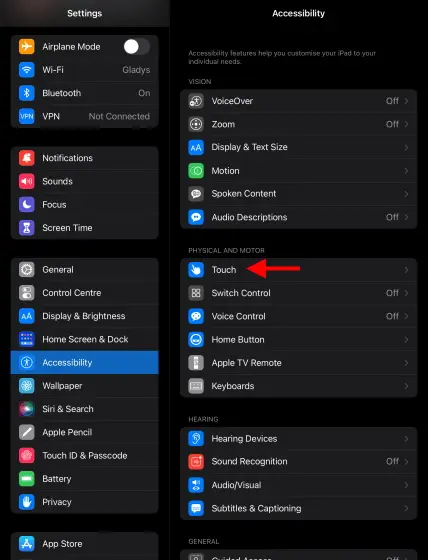
Step 2: Scroll down and tap on accessibility.

Step 3: Now go to touch.
Step 4: Here you will find the assistive touch and tap it, and a new menu will appear.
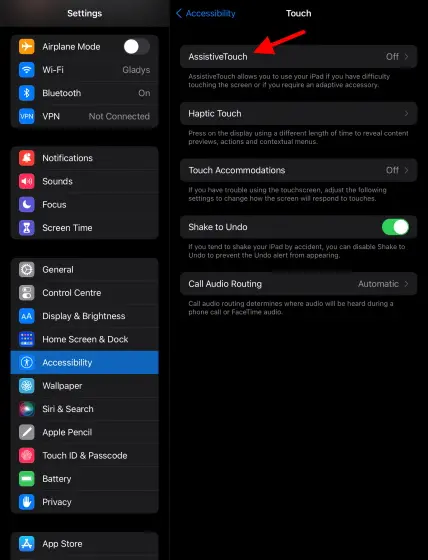
Step 5: Now to enable the assistive touch, toggled on the assistive touch.

Step 6: Now create the shortcut by your choice of how you want to access the assistive touch.
Method 3: With The Help Of Apple Pencil
Apple iPad Air 4 comes with an apple pencil or stylus. Apple pencil makes the process of taking screenshots easy. To take screenshot on iPad air 4 by using an apple pencil or stylus follow these simple steps that will make the process easy.
Step 1: To take a screenshot on iPad Air 4 open your iPad.
Step 2: By using an apple pencil swipe from either bottom corner towards the center.
Step 3: You will see a flash and a screenshot is taken.
Step 4: Done.
This is the process to take screenshot on iPad Air 4. Which will make your life easier to store what you want to see in the future.
Where Can I Find My Screenshots?
After taking a screenshot are you struggling to find the screenshot? Well, this screenshot is stored in the Photos app on your iPad Air 4. Follow these simple steps to find out the screenshot on your iPad Air 4.
Step 1: Go to photos.
Step 2: In the sidebar, you will see a folder named screenshot under media types.
Step 3: Tap on the screenshot folder here you will find all the screenshots.
Step 4: Done.
Conclusion
So let’s wrap this article here. In this article, we have discussed how to take screenshot on iPad Air 4. And we have explained the method step by step. So If you find it relevant to your problem, spread it to family and friends. If you have any queries, feel free to write them in the comment box.
Frequently Asked Questions
Q. How Do You Screenshot On An iPad Air 4?
To take screenshots on iPad air 4 press the power button and volume up button for a few seconds and the screen will flash and the screenshot will be displayed. And you can also take screenshots by using an apple pencil. To take a screenshot using a pencil you just have to swipe from either bottom corner of the screen towards the center and a screenshot will be taken.
Q. Why Can’t I Take A Screenshot On My iPad Air?
If you are enabled to take screenshots follow these simple steps and your work will be done.
First, go to settings> Now open accessibility > Now go to assistive touch > And now toggled on the assistive touch > and create your own shortcut > now you will be able to take screenshots without any hindrance.