Do you constantly keep getting notifications on Facebook? Are you looking for ways to turn off @friends notifications on Facebook? We got you covered. We present to you a complete guide on how to turn off @friends notifications on Facebook.
Facebook is one of the best networking platforms that helps users to stay connected with all their friends. It keeps you posted on all the updates on the app, by sending notifications. This feature will be quite useful when you have a handful of friends. Would you like it, if you constantly keep getting Facebook notifications from thousands of users on your friends list?
You will be able to turn off @friends notifications on Facebook by the following instructions given below.
Facebook > Login > Menu icon > Settings > Notifications > Tags > Batch @everyone mentions > Turn off.
@friends notifications are the notifications that you receive on Facebook every time that one of your friends mentions you on Facebook post, or a comment or an update in a group that you follow. Facebook users have taken to social platforms, to voice their complaints, and looking for ways to turn off @friends notifications on Facebook. With this new updated feature, users can now have control on the notifications that they receive from the app.
How To Turn Off @Friends Notifications On Facebook?
Imagine that your phone dings every time your friends make an update in their Facebook account. What would you do if hundreds of your Facebook friends keep updating their Facebook accounts? Your phone will constantly keep ringing with every notification made. We understand that this is going to be very distracting and even annoying.
We are here with the solution to stop the ‘dings’ made by the notifications. All you have to do is just turn off @friends notifications on Facebook. You will stop receiving all the Facebook post notifications if you disable this feature. Just follow the instructions given below to turn off @friends notifications on Facebook.
Step 1 – Open Facebook app on your device.
Step 2 – Login to your profile is necessary.
Step 3 – Click on the Menu icon at the top right corner of your screen.

Step 4 – Click on the Settings icon.
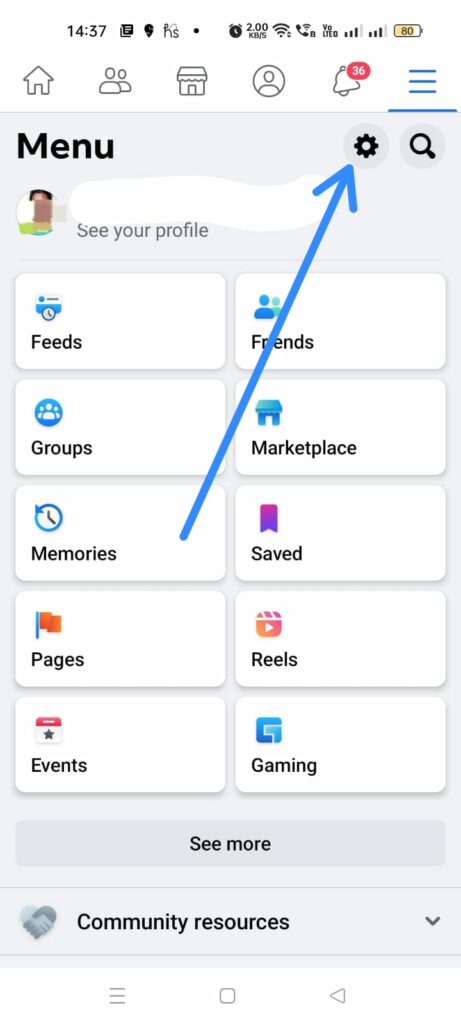
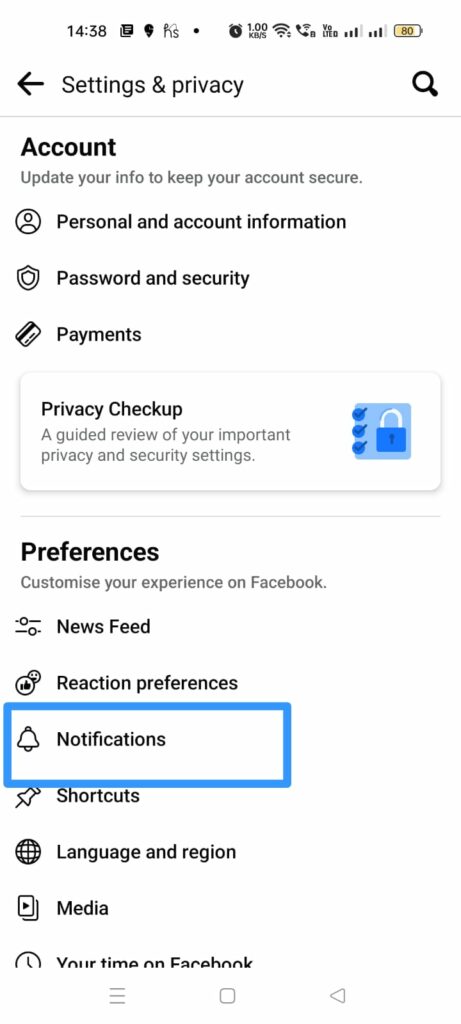
Step 6 – Select Notifications under Preferences.
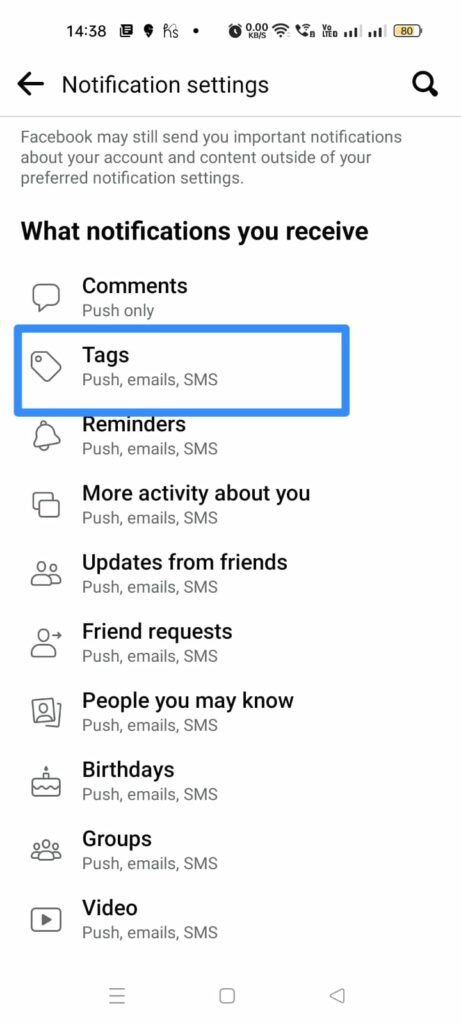
Step 7 – Click on Tags.
Step 8 – Under receive notifications for, click on the toggle to turn off Batch @everyone mentions.
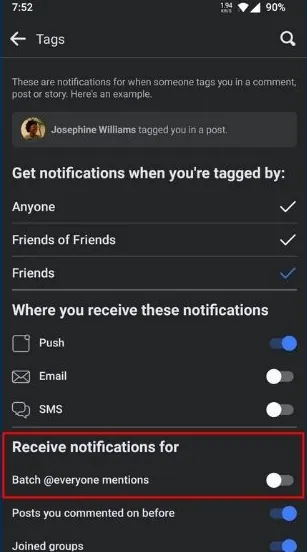
You have now successfully turn off @friends notifications on Facebook. You will no longer receive random notifications from irrelevant friends.
How To Manage Notifications On Facebook?
New Facebook updates have given freedom to all users to efficiently manage the notifications that they receive. Facebook users receive notifications of updates in the Facebook activities of all their friends, updates on the posts that they have previously commented on, people who you have mentioned on your posts and updates from all the Facebook groups that you have joined in.
You will be able to manage notifications of your Facebook account by the following steps.
Step 1 – Open Facebook app on your device.
Step 2 – Login to your profile is necessary.
Step 3 – Click on the Menu icon at the top right corner of your screen.

Step 4 – Click on the Settings icon.

Step 5 – Select Notifications under Preferences.

Step 6 – Click on Tags.

Step 7 – Click the toggle to turn off unwanted notifications.
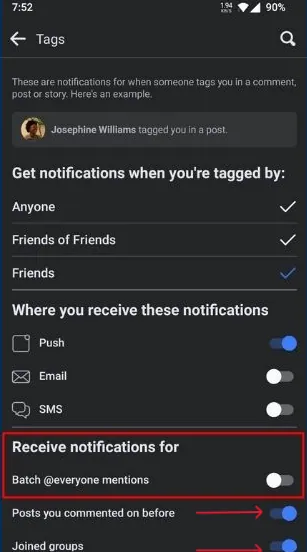
By following the instructions given above, you will be able to have control on the notifications that you receive on Facebook.
How To Turn Off @Friends Notifications On Facebook On PC?
Are you using Facebook on your personal computer? If you wish to turn off @friends notifications on Facebook on your computer, you should know that there is no specific way to do so. However, you can alter the default settings to regulate the notifications that you receive.
To turn off @friends notifications on Facebook in your personal computer follow the steps mentioned below.
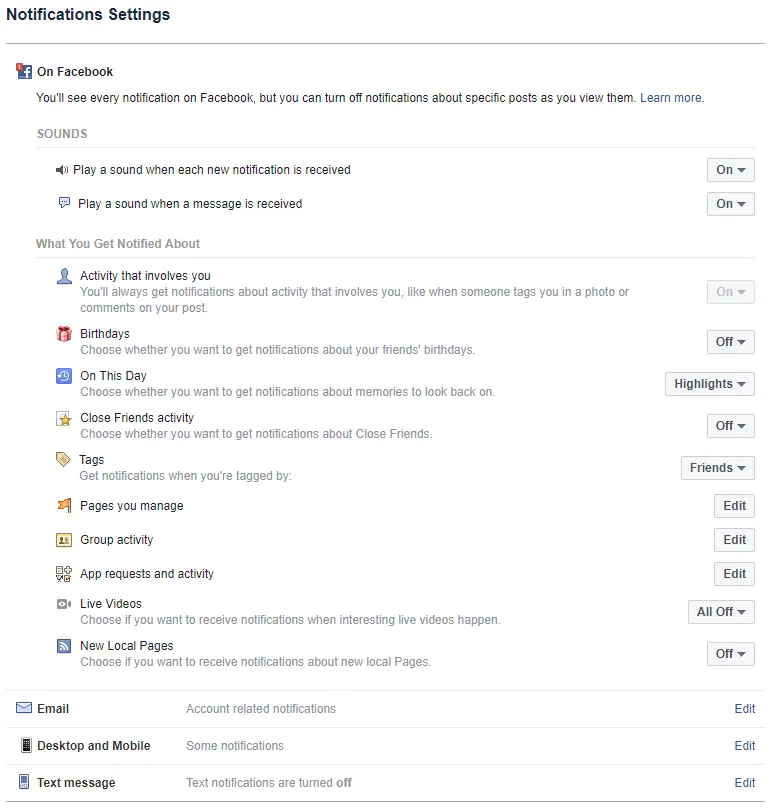
Step 1 – Open Facebook.com on your computer.
Step 2 – Login to your account if necessary.
Step 3 – Click to open Settings.
Step 4 – Click on Notifications on the left hand panel.
Step 5 – Select Tags from the list of notifications.
Step 6 – Choose Only Friends to stop receiving random notifications.
You have now successfully made the necessary changes to manage the notifications that you receive on Facebook.
Wrap Up
Facebook is a constantly evolving app. Developers make regular updates to the app for the benefit of all users. Some users wish to receive regular notifications so that they do not miss out on any new updates made to their account, while others do not wish to be disturbed by the constant updates. Facebook gives you the opportunity to make the choice. We hope that with the help of this article you were able to turn off Batch @everyone mentions.
Frequently Asked Questions
Q1 What Is @Friends Notifications On Facebook?
@friends notifications are the notifications that you receive on Facebook every time that one of your friends mentions you on Facebook. Every time someone mentions you on a post, or a comment or an update in a group that you follow, will automatically send you a notification.
Q2 How Do I Turn Off @Friends Notifications?
Follow the instructions given below to turn off @friends notifications on Facebook.
Step 1 – Open Facebook app on your device.
Step 2 – Login to your profile is necessary.
Step 3 – Click on the Menu icon at the top right corner of your screen.
Step 4 – Click on the Settings icon.
Step 5 – Select Notifications under Preferences.
Step 6 – Click on Tags.
Step 7 – Under receive notifications for, click on the toggle to turn off Batch @everyone mentions.
Q3 How To Manage Notifications On Facebook?
You will be able to manage notifications of your Facebook account by the following steps.
Step 1 – Open Facebook app on your device.
Step 2 – Login to your profile is necessary.
Step 3 – Click on the Menu icon at the top right corner of your screen.
Step 4 – Click on the Settings icon.
Step 5 – Select Notifications under Preferences.
Step 6 – Click on Tags.
Step 7 – Click the toggle to turn off unwanted notifications.
By following the instructions given above, you will be able to have control on the notifications that you receive on Facebook.

