
Are you facing issues in logging in to your iCloud? Have you forgotten your Apple login credentials? Do not worry, we are here to help you to bypass iPhone DNS. Read and follow the instructions given in this article and you will be able to easily bypass iPhone DNS.
Did you buy a second-hand iPhone? Then you will have difficulties in accessing the device’s iCloud as the login details will be available only with the initial buyer. In such situations, instead of connecting to iCloud, you can bypass iPhone DNS by connecting to custom servers that are built specially to assist you to overcome the activation lock of your device.
1.Bypass iPhone DNS to Unlock device
2.Use bypass iPhone DNS Crash
3.Use third-party DNS software
iCloud DNS bypass is a way to access the iCloud locked iPhone temporarily. The Domain Name Server or DNS translates your domains into IP addresses. If you enter your domain name into your browser, the DNS server will take you to the correct IP address on the internet. Every time you turn on your device, it will automatically connect to the DNS and then reach your Apple servers. This server will help you to unlock your device.
How To Bypass iPhone DNS?
Is the iCloud activation lock enabled in your second-hand iPhone? You will be asked to enter the login credentials to authenticate your Apple ID. Do not worry if you cannot get the necessary details from the original owner of your device. There are various iCloud DNS bypass tools which you can use to unlock your iCloud-locked device. This can be also used by Apple users who have forgotten their Apple ID and password.
You can manually change the DNS address in your Wi-Fi settings. This will give you access to various apps and enhance the features of your device.
Before you begin to bypass iPhone DNS, you should know that
· There is no guarantee that you can bypass iPhone DNS.
· This might not support all versions of iOS devices.
· It is not a permanent solution.
· Check if you have a stable internet connection before you begin to bypass iPhone DNS.
Bypass iPhone DNS to Unlock
Now, let us know how to bypass iPhone DNS and unlock the activation lock on your device. You will enter into a third-party DNS server to unlock it. Check that your device has good battery life and good network connection before you begin to bypass iPhone DNS.
Turn on the device > Select language & country > Settings > Wi-Fi network > i button > Configure DNS > Manual > Enter DNS server > Back button
Step 1 – Turn on your iPhone.
Step 2 – Select a language of preference and your country to access location.
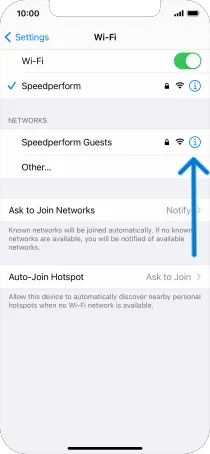
Step 3 – Go to your Settings > Wi-Fi network.
Step 4 – Click on the ‘i’ button near your Wi-Fi network.
Step 5 – Select Configure DNS to add a custom DNS to your iPhone.
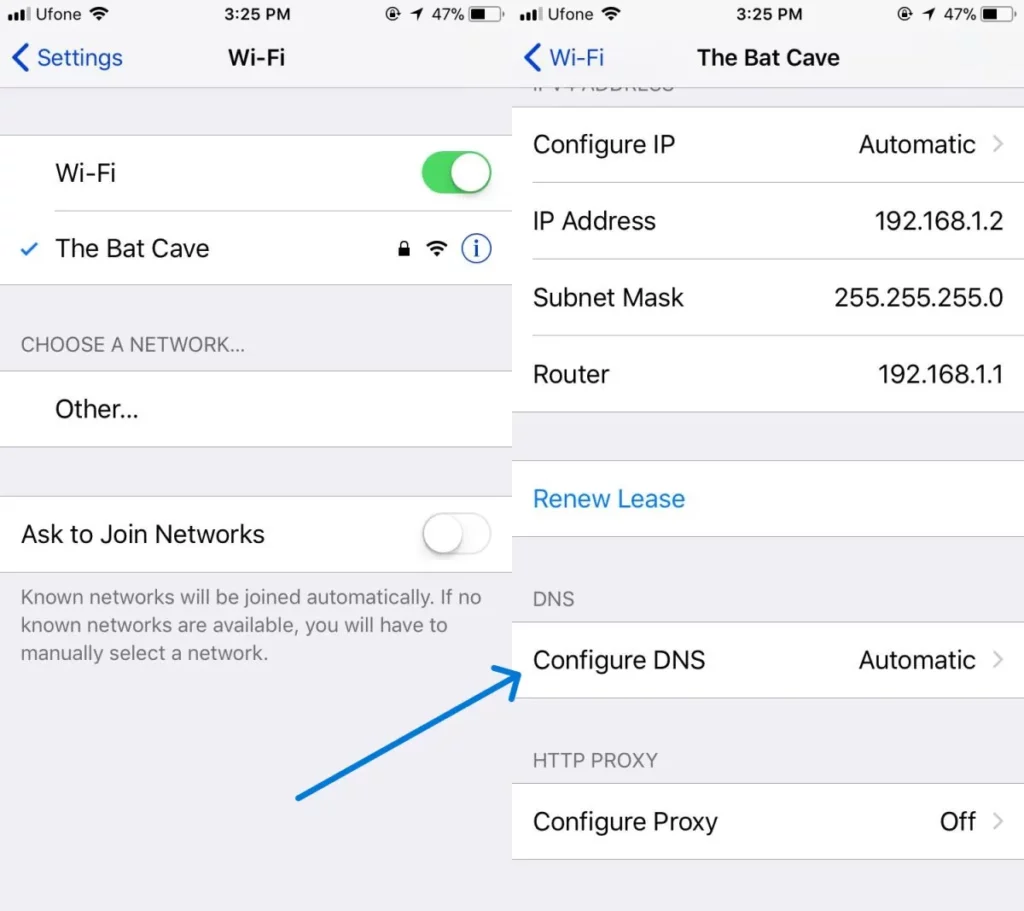
Step 6 – Click on Manual at the top of the page.
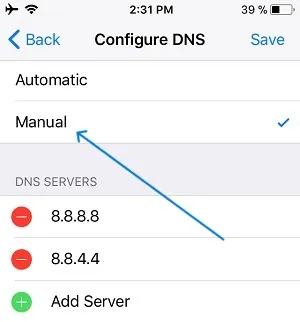
Step 7 – Enter the DNS server of your region into the input field.
USA: 104.154.51.7
Europe: 104.155.28.90
Asia: 104.155.220.58
South America: 35.199.88.219
Australia and Oceania: 35.189.47.23
Step 8 – Click the Back button at the top left corner of the page.
Step 9 – Click on Back again to see the DNS server screen.
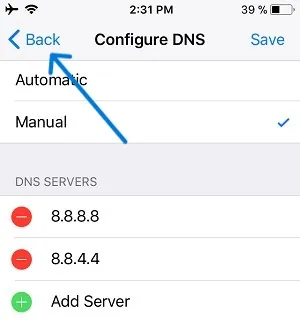
You will now be able to configure the options that are available on your device.
Related : How To Sign Into Apple TV With iPhone To Bypass Typing Credentials Manually?
Use Bypass iPhone DNS Crash
Have you successfully unlocked your device by following the instructions given above? Now, let us fully unlock all the features in your device by ‘crashing’ it.
Menu > Applications > Crash > Select Language & Country > Choose Wi-Fi network > Home Button > Wi-Fi Settings > i button > Menu > Configure Proxy > Manual > Enter 8888 port number > Save.
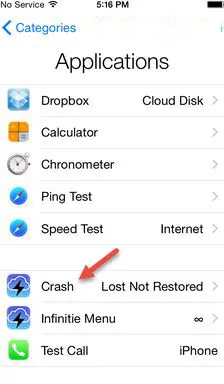
Step 1 – Open Menu > Applications in your device.
Step 2 – Scroll down and select Crash.
Step 3 – Your iPhone will automatically reboot.
Step 4 – When your iPhone restarts Select your Language and Country.
Step 5 – Click on Choose a Wi-Fi network > Home Button > Wi-Fi Settings.
Step 6 – Click on ‘i’ button near Wi-Fi.
Step 7 – Go to Menu > Configure Proxy.
Step 8 – Select Manual.
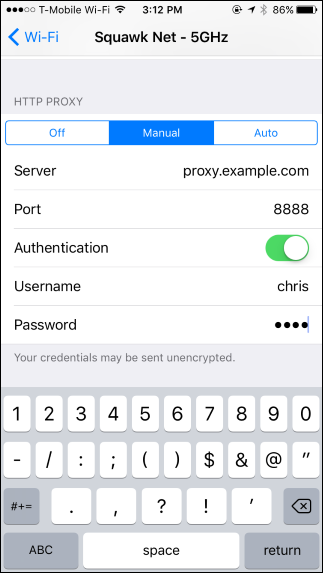
Step 9 – Clear the existing HTTP address and the list of emoji icons on the Server.
Step 10 – Enter ‘8888’ as the port number.
Step 11 – Click to Save at the top right corner of your screen.
Step 12 – Tap on Back or Next to go to your unlock screen.
Step 13 – Press on the Home button to unlock your device.
You will now be able to access all the apps and features in your device. But if you reboot your iPhone it will automatically go to the iCloud activation lock screen. You might not succeed to bypass iPhone on DNS at your very first try. Follow the instructions again and try to bypass iPhone DNS.
Related : How To Bypass iCloud Activation Lock Without Jailbreak?
Bypass iPhone DNS With Third-Party Software
Are you still facing difficulties to bypass iPhone DNS? Even though iCloud DNS bypass is an efficient way to unlock your device it is not convenient to use as you will be redirected to the iCloud activation screen every time you restart your device. There are many third-party software like iSalvator and Any Unlock that are designed especially to bypass iOS devices. They will work efficiently to remove the iCloud lock from your iPhone. They provide the most effective and quickest way to activate your locked iPhone easily.
Wrap Up
Every time you set up your iOS device to factory reset or restore your phone settings, your device will send an activation request to the Apple server. Your request will then be processed to display the status of your device. You can turn on your device’s Find my iPhone function to see the iCloud Activation Lock screen to enter your login details. If you have forgotten your login credentials, we hope that you are able to bypass iPhone DNS by following the instructions given in the article.
Frequently Asked Questions
Q1 What Is DNS Bypass?
iCloud DNS bypass is a way to access the iCloud locked iPhone temporarily. The Domain Name Server or DNS translates your domains into IP addresses. If you enter your domain name into your browser, the DNS server will take you to the correct IP address on the internet. Every time you turn on your device, it will automatically connect to the DNS and then reach your Apple servers. This server will help you to unlock your device.
Q2 Can iPhone Locked To Owner Be Bypassed?
Yes. You can manipulate the iCloud DNS Bypass server by rerouting the activation route of your device to an alternate server. You can bypass iPhone DNS to unlock the device.
Q3 Can You Change DNS On iPhone?
Yes you can.
Step 1 – Open Menu > Applications in your device.
Step 2 – Scroll down and select Crash.
Step 3 – Your iPhone will automatically reboot.
Step 4 – When your iPhone restarts Select your Language and Country.
Step 5 – Click on Choose a Wi-Fi network > Home Button > Wi-Fi Settings.
Step 6 – Click on the ‘i’ button near Wi-Fi.
Step 7 – Go to Menu > Configure Proxy.
Step 8 – Select Manual.