

Are you someone who is new to XDEFI wallet and do not know how to create and set it up? In this article, let us see how to create and set up XDEFI wallet.
A cross-chain wallet extension is called XDEFI Wallet. All of your assets fit in one wallet. You may safely trade, store, and send NFTs and assets across 15 blockchains with the non-custodial wallet XDEFI.
To create and set up XDEFI wallet, Launch XDEFI > Download > Add to chrome > Click icon from chrome extension > Create XDEFI wallet > Create password > Seed phrases shown > Verify seed phrase > Create wallet name > Click Complete.
Continue reading further to understand how to create and set up XDEFI wallet and what steps are involved in it.
How To Create And Set Up XDEFI Wallet?
To create and set up XDEFI wallet, Launch XDEFI > Download > Add to chrome > Click icon from chrome extension > Create XDEFI wallet > Create password > Seed phrases shown > Verify seed phrase > Create wallet name > Click Complete
The world’s quickest DeFi & NFT wallet is called XDEFI. Users of the XDEFI Wallet have access to “Ape Mode,” an improved feature that helps guarantee transactions are executed in the following block and works across the Terra, THORchain, Ethereum, and EVM blockchains. Additionally, the wallet shows NFTs from nine or more chains in a single drag-and-drop grid. You must first create and set up XDEFI wallet to avail all of its benefits.
How To Create XDEFI Wallet?
Step 1: Visit the XDEFI website to install the application. The Download option can be found on the home page.
Step 2: It will direct you to the page where you click the “Add To Chrome” button, the wallet program will request your approval before being added as a browser extension.
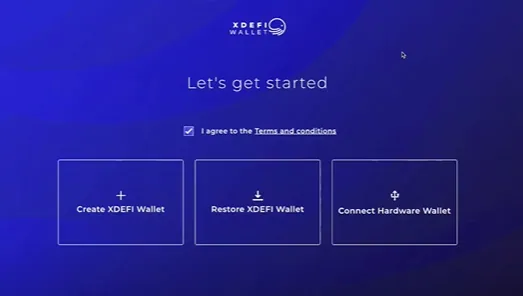
Step 3: Now click on the XDEFI by tapping on the puzzle-shaped Chrome extension icon and you will be in the wallet, press “Let’s get started”.
Step 4: You can set up your wallet using the following three options utilizing the application:
- Create XDEFI Wallet
- Restore XDEFI Wallet
- Connect Hardware Wallet
Step 5: Since you are new to the wallet, you can choose the option, “Create XDEFI Wallet”, and check the Terms and condition check box.
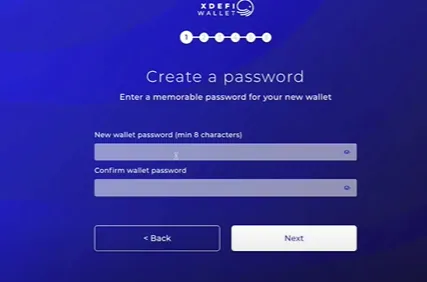
Step 6: Next, create a strong password and retype it in the confirm password box. This is necessary to access your XDEFI wallet.
Step 7: Now, you will be presented with the seed phrases. You can either note it down by hand or click on the copy icon and copy it to the clipboard. Make sure no one is watching the screen while performing this step and click “Next”.

Step 8: Verify the seed phrase by entering the words and click “Next”.

Step 9: Now, enter a name for your wallet and click “Next”
Step 10: If you want to use XDEFI as your default wallet, turn on the toggle icon and you can deactivate it anytime you want.

Step 11: Now, you will be provided with a number of chains and you can choose the chains that you want to show in your wallet by enabling the toggle icon
Step 12: Finally, click “Complete”
With these steps, you have successfully created the XDEFI wallet.
How To Set Up XDEFI Wallet?
After creating the wallet, you will land on the home page where you can set up the wallet.
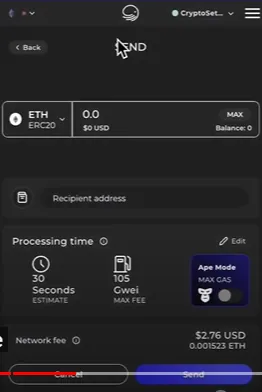
- On the homepage, you will see the option to Send, Receive and Buy cryptocurrencies by clicking on the respective buttons
- If you want to send cryptocurrency, XDEFI provides you with a new feature called the “Ape mode”. This feature used GAS algorithm to ensure transactions get to the next block without wasted GAS. Hence you toggle on this feature for a smooth transaction even when the network is congested
- If you want to send cryptocurrency, XDEFI provides you with a new feature called the “Ape mode”. This feature used GAS algorithm to ensure transactions get to the next block without wasted GAS. Hence you toggle on this feature for a smooth transaction even when the network is congested
- You can search certain coins by using the search bar and filter chains
- You are also allowed to swap networks by clicking on the top left icon on the homepage and also switch wallets by clicking on the account bar
The hamburger icon on the right gives you some advanced features in setting up your XDEFI wallet.

- The contacts option allows you to store all the addresses of your friends with their names
- The wallet management option allows you to connect to a hardware wallet, import a wallet or perform an XDEFI backup
- The settings option allows you to change the login password, manages RPC and Node URLs, chain management and gives access to currency settings

Therefore, you can easily create and set up XDEFI wallet by performing these steps.
How To Setup XDEFI Wallet With Ledger?
Launch XDEFI > Connect hardware wallet > Create password > Choose hardware wallet > Select Ledger > Next > Enter PIN > Choose chain management application > Connect ledger device > Click connect > Unlock selected > Import hardware wallet to XDEFI
Step 1: Launch the XDEFI wallet and click the “Connect hardware wallet”.
Step 2: Create a password.
Step 3: The next step is to choose a hardware wallet to connect with. Click Next after selecting Ledger.
Step 4: Utilize the USB port on your Ledger device to connect it to a computer.
Step 5: For the device to unlock, enter your PIN.
Step 6: Choose the chain management application you want to use.
Step 7: Return to the XDEFI Wallet panel after that, and click Next.
Step 8: You will see a pop-up window in the upper left requesting you to connect your Ledger device.
Step 9: Click “Connect” after selecting your device. One more time, you’ll see the page for connecting a hardware wallet.
Step 10: Click “Next” after selecting Ledger.
Step 11: Click “Connect” after choosing the chain and derivation path for the application you want to manage.
Step 12: Click “Unlock Selected” after choosing one or more addresses to import.
Step 13: A notification indicating that the import is finished will appear.
Step 14: You can now import a different hardware wallet or return it to XDEFI Wallet.
By following the above steps, you can create and set up XDEFI wallet.
Wrapping Up
This is all about XDEFI wallet, so what are you waiting for? Follow the same process as we have mentioned above and start to create and set up XDEFI wallet on your own. We hope this article has given you enough explanation of how to create and set up XDEFI wallet. For more such informative and interesting articles, check out us at Deasilex.
Frequently Asked Questions
Q1. How To Get XDEFI Wallet?
Ans. You may buy XDEFI Wallet directly from the Coinbase Wallet app on your smartphone. On the Assets tab, click the (+) Buy. Then select the “Trade” option to exchange ETH for any token that adheres to the Ethereum protocol (also known as “ERC-20 tokens”). In the “choose coin” menu, choose XDEFI Wallet.
Q2. Is XDEFI Wallet Open source?
Ans. No! XDEFI wallet is not open source at the moment.
Q3.Who Owns XDEFI Wallet?
Ans. DeFiance Capital, Morningstar Ventures, Animoca Brands, Alameda Research, Sino Global Capital, and 5 more are among the investors of XDEFI.
Q4.Does XDEFI Wallet Support Solana?
Ans. You may securely store, send, and swap Solana (SOL) tokens within the XDEFI wallet. Solana and all SPL tokens are supported by the multichain XDEFI Wallet, which also supports over 9000 tokens overall.