
When using smart devices like laptops, a WiFi connection is one of the most fundamental requirements. It not only keeps you in touch with your friends and family, but it also updates your software and apps to the most recent version. Additionally, wireless connections make your laptop more portable and provide you access to all of its capabilities. But what if your Lenovo laptop not connecting to WiFi anymore?
Goining through wireless network connection issues for Lenovo laptops is very common. You are not alone. Join the club and learn how to fix the laptop WiFi connection issue. But, where to start from?
Here is what you can do if you are experiencing your Lenovo laptop not connecting to WiFi. Check to see if your wireless network is operational and active first. Check your modem and router settings, as well as the cable connections. Can another device connect to your wireless network? Let’s now examine the Windows desktop. The wireless icon should be shown in the notification section. Confused? Let’s go through the article and learn step by step.
The solution to Fix Lenovo Laptop Not Connecting to WiFi Issue
Try the following solutions. Try all of the following steps Work your way down the list until your Lenovo laptop connects to WiFi. However, you don’t have to try them all.
- Troubleshoot your issue
- Update the driver for your wireless adapter
- Enable the service WLAN AutoConfig
- Set the wireless adaptor to “on”
- Configure the wireless adapter’s power management settings in place
- Manually add your WiFi network
1. Troubleshoot Your Issue

It’s time to troubleshoot. It’s easy. Simply attempt to discover and access your wifi network using a different device, such as a computer, a smartphone, etc. If other devices successfully identify and connect to your WiFi network, it is without a doubt a problem with your Lenovo laptop. If other devices cannot detect your Wireless internet at all, then it is a WiFi issue, and you should check your Network adapter or contact your ISP.
2. Update the Driver For Your Wireless Adapter
You will have network problems, such as a failure to recognize your wireless network, if the network adapter driver is faulty or missing. So make sure you download the most recent driver for your wireless network device. Your network adapter driver can be updated manually or automatically.
Update drivers manually – To manually update your WiFi driver, get the most recent version from the manufacturer’s website, and then install it on your computer. Time and computer expertise are needed for this.
Update drivers automatically – If you lack patience or time, Driver Easy can update your drivers for you.
Now join your wireless network and check to see whether it functions. Don’t give up if your Lenovo laptop not connecting to WiFi. There are further options to consider.
3. Enable The Service WLAN AutoConfig

The WLAN AutoConfig service offers the reasoning necessary to configure, discover, join, and leave a wireless network. Therefore, this crucial service determines whether or not your Lenovo laptop recognizes WiFi networks.
The WLAN AutoConfig service needs to be set to operate. Take these actions:
- To open the Run box, simultaneously hit the Windows logo key and R on your keyboard.
- After entering services.msc, click OK.
- Double-click WLAN AutoConfig after scrolling down.
- Under the General tab, make sure that the “service status” is Running and change the Startup type to Automatic.
- In order to save your changes, click Apply and OK.
Now enable WiFi and check to see whether wireless networks can be found.
Related: How to Fix Dell Laptop Not Connecting To WiFi | In 6 Easy Steps!
4. Set the Wireless Adaptor to “On”
This is probably the easiest yet most effective step to resolve the laptop not connecting to the WiFi issue. Some Lenovo laptops have a hardware switch that customers can use to toggle the wireless network capability on and off. On a laptop, the switch typically rests on the side edges. Try checking the Lenovo laptop and turning the button to the ON position.
Do not be concerned if you cannot see a hardware switch. On the majority of Lenovo laptops, users can enable wireless networking by hitting the Fn and F5 keys together on the keyboard. You might then see a window appear and activate the wireless network.
If your laptop cannot detect WiFi even though you have enabled the wireless network feature, don’t worry. Go on to the following remedy.
5. Configure Wireless Adapter’s Power Management Settings
Your wireless adapter’s power management setting has the potential to have an impact on your wireless network functionality, particularly on laptops.
Follow the instructions below:
- To open the Run box, simultaneously hit the Windows logo key and R on your keyboard.
- After entering devmgmt.msc, click OK.
- Right-click on the wifi network adapter or double-click Network adapters, then select Properties.
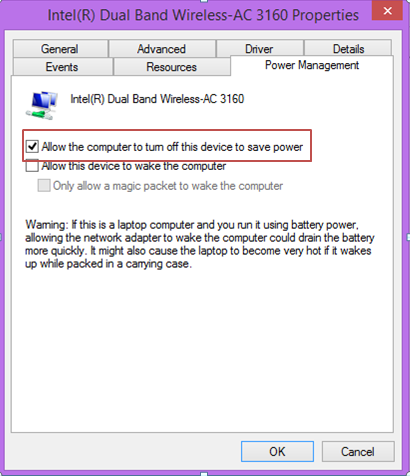
- 4) Select the Power Management tab, uncheck the box to the right of Let the computer turn off this device to conserve power, and then select OK.
- Your wireless adapter won’t be turned off to conserve battery if you do this.
- Reboot your laptop and attempt to connect to your WiFi networks.
Still, struggling with the laptop not connecting to the WiFi issue? The last step may help you out on the quest!
6. Manually Adding Your WiFi Network
If your Lenovo laptop still can not recognize wireless networks after trying the aforementioned methods, manually add your WiFi to the device and connect to it.
You must take the following actions:
- Press the Windows logo key and at the same time on your keyboard to launch the Settings app.
- Click Network & Internet.
- Click WiFi on the left, then click Manage recognized networks. Then, select “Add a new network.”
- Enter the required information in the popup, such as the Security type and the Network name. After checking the option next to Connect automatically, click Save.
- Your wireless network should appear when you hit the “Internet icon” in the lower right corner. Click it to connect.
Wrapping up
Now that you have learned 6 easy steps to deal with the Lenovo laptop not connecting to WiFi issue, you should be confident whenever you are facing trouble. If you have a laptop other than Lenovo, which is also showing a similar issue, let us know in the comment section. We will be glad to help you out.
FAQs
Q1. Why Is My Laptop Not Allowing Me To Connect To Wi-Fi?
Choose Update driver > Search automatically for current driver software, choose the network adapter, and then adhere to the on-screen directions. Whether you are prompted to restart after installing the new driver, choose Start > Power > Restart and check to see if it resolves the connection problem.
Q2. How Do I Connect My Lenovo Laptop To Wi-Fi?
Here is what to do:
- Go to Settings by clicking the Windows button.
- The Internet & Network option.
- Choose Wi-Fi.
- After you turn on Wi-Fi, a list of available networks will appear. Go to Connect. Turn on or off WiFi.
Q3. How Do I Reinstall My Network Adapter Driver?
When you restart the computer after uninstalling the network adapter driver, Windows will automatically install the most recent driver.
- Select device manager by pressing Windows key + X.
- network adapter expansion
- Remove the driver by performing a right-click on it.
- Check the computer’s operation after a restart.