
Have you ever wondered make time-lapse video iPhone? If yes, do you know how to take make a perfect one on iPhone? Well, this article teaches you how to make time-lapse video iPhone.
Time-lapse is the process of recording a lengthy video in a short span of time without spoiling its beauty. A time-lapse only records 1-2 frames per second opposite to the 24–30 frames per second that a normal video would record. Anybody may create a stunning time-lapse film of a sunset, moving clouds, a blooming flower, a culinary recipe, or even the construction of a building. Time-lapse videos are not just for photographers.
To make time-lapse video iPhone, Get the camera app open > Choose TIME-LAPSE from the camera choices > Install a tripod under the iPhone > Press the record button > Your time-lapse video will be saved in the Recents and Time-lapse section.
In a short amount of time, the time-lapse makes the long and boring video more noticeable and interesting. To understand how to make time-lapse video iPhone by yourself, continue reading.
How To Make Time-Lapse Video iPhone?
All the work is done by the camera app, but it needs to be properly configured.
To make time-lapse video iPhone, Get the camera app open > Choose TIME-LAPSE from the camera choices > Install a tripod under the iPhone > Press the record button > Your time-lapse video will be saved in the Recents and Time-lapse section.
To Capture Time-Lapse Video On iPhone
Step 1: Get the camera app open.
Step 2: To choose TIME-LAPSE from the camera choices swipe to the right.
Step 3: Install a tripod under the iPhone.
Step 4: The region you want your video to focus on should be tapped and held.
Step 5: Press the record button.
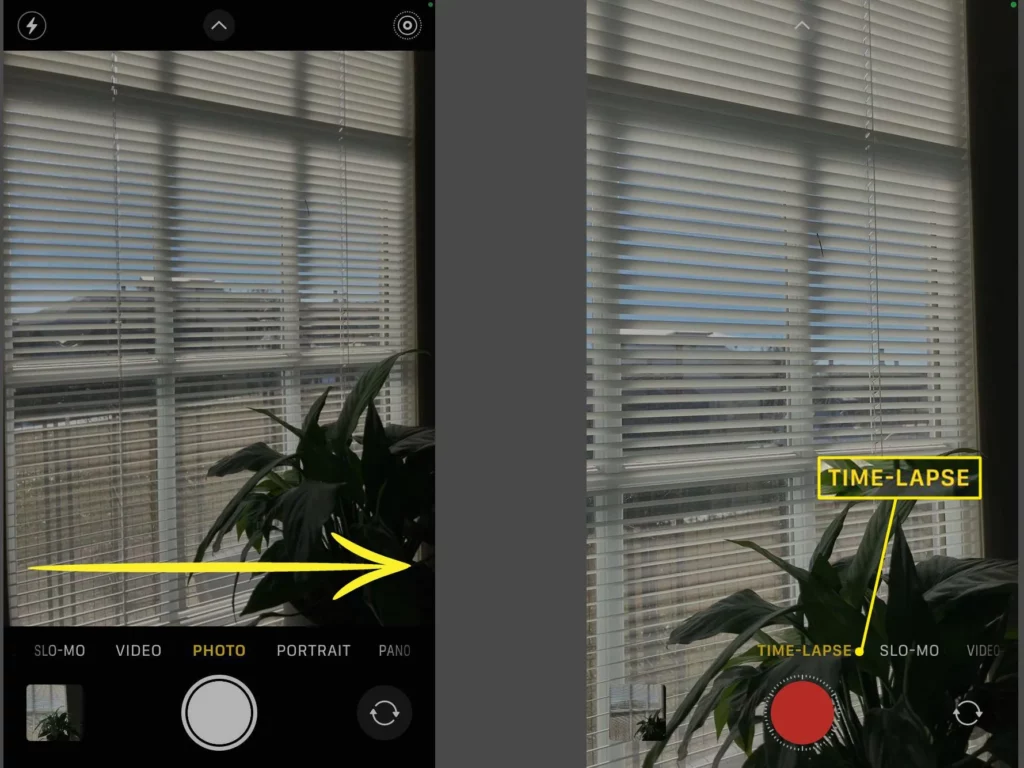
Step 6: To finish, press the record button once again.
The video will be saved in the Recents and Time-lapse section of your Photo library and by following these steps, you can make time-lapse video iPhone.
How To Capture A High Quality Time-lapse Video?
You can get creative with the video that you choose to time-lapse. But make sure to remember a few things before you start shooting, to get a high-quality video as output. We have listed down a few of them.
1. Use A Proper Surface
A tripod is necessary to capture movement in multiple frames from the same location, which is essential for creating amazing time-lapse videos. There are people who keep their phones on an uneven surfaces, some even use their hands to capture the video, just like taking a normal photo investing in a tripod would definitely make wonders.
2. Employ AF/AE Lock
Holding your finger down on the screen and locking the exposure and focus before taking a picture will ensure that they are the same for every frame in your time-lapse.
3. Use A Fully Charged Device
Naturally, recording a lengthy video like a time-lapse would use a lot of battery, and you don’t want your iPhone to run out of power before you are done. Before beginning your time-lapse project, make sure your battery is completely charged. A good time-lapse video should be captured upto a minimum of 30 minutes.
4. Edit The Video
You can edit a time-lapse video by adjusting its speed. Use a third-party app like Lapse It if your finished time-lapse video plays too quickly or slowly. The Lapse It editor will merely add duplicate frames to stretch out the footage so that your time-lapse plays over a larger time frame or it can shorten your frame.
5. Add Filters To The Video
Just like adding filter effects to a photo, you can also add filters to your time-lapse video. You can add filters by simply choosing a video and by clicking the filter icon located at the bottom. From the list of available filters, choose your favorite filter and note carefully that the filter will be applied to the entire video.
How To Make a Time-Lapse Video From A Normal Video?
Launch iMovie > Press Create Project > Click Movie you want to time-lapse > Hit Create movie > In the timeline, tap the video > Tap the clock > Drag the speed slider > Tap the share icon > Select save > Video will be stored in camera roll
What if you want to see the time-lapse version of a video that you already have? Well, You can time-lapse any movie on your iPhone using the iMovie app, whether you accidentally recorded a regular video instead of a time-lapse video or you want a time-lapse version of a video you’ve previously taken. iMovie is an inbuilt app available in all Apple devices. The steps involved are:
Step 1: Launch iMovie.
Step 2: Press + Create Project.
Step 3: Click Movie.
Step 4: When you have chosen the video you want to time-lapse, hit Create Movie.

Step 5: In the timeline, tap the video.
Step 6: In the bottom left corner, tap the clock.
Step 7: Drag the speed slider to the right using your finger and click done.
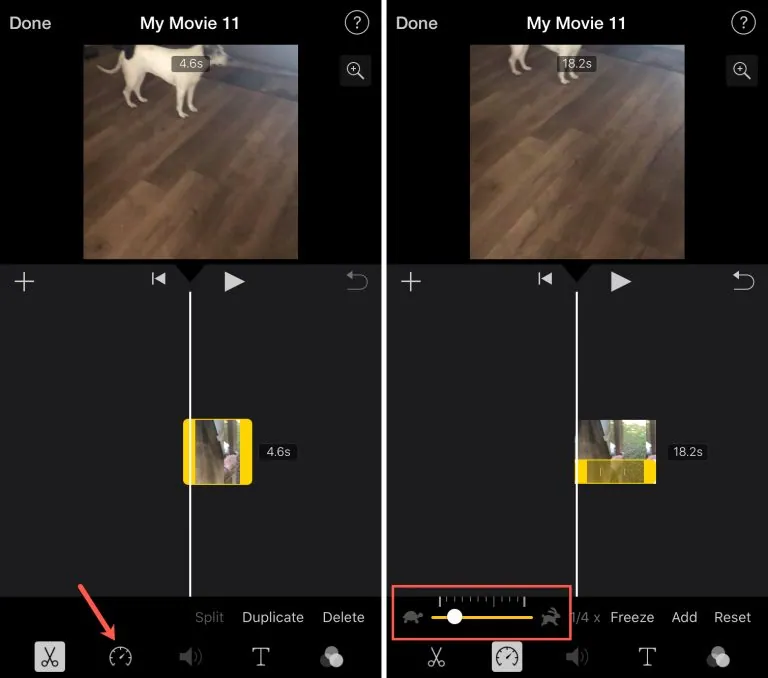
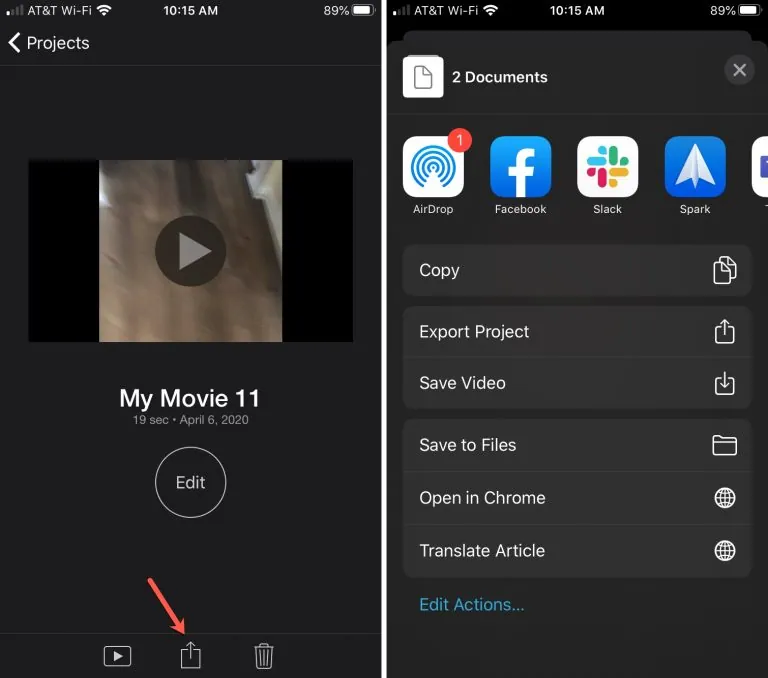
Step 8: Tap the share icon and then select save.
Step 9: The video will now be stored in the camera roll.
Unlike the iPhone camera, iMovies cannot reduce the frame to 1-2 seconds. iMovie time lapses a video just by doubling its speed. Though it cannot be matched with the quality of the iPhone time-lapse feature, iMovies also does a decent job.
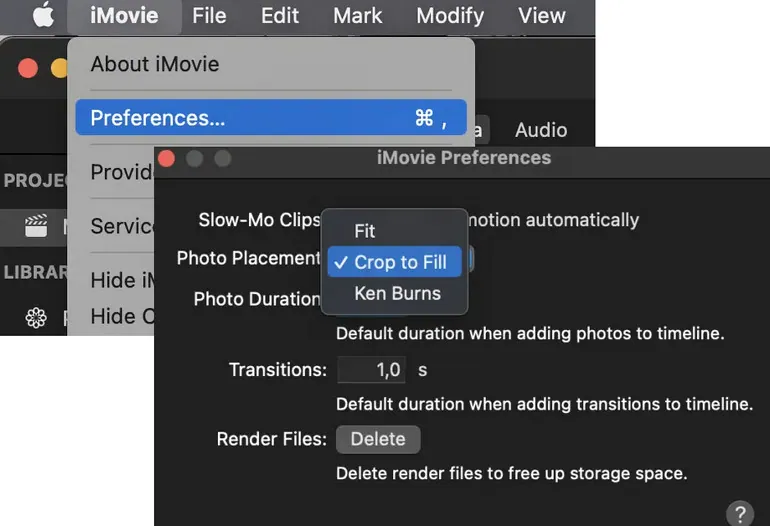
How To Make Time-Lapse Video From A Photo?
Open iMovie > Start a new project > Select “Movie” > Go to “Photo Placement” > change the option to “Crop to fill” > adjust the Photo Duration to “0,1 seconds” > Select “Import media” > Drag all of your photo series into the timeline > The file will need to be exported > Click on the tiny speed meter symbol
It is not possible to make a time-lapse video from a photo using an iPhone. However, this can be done by using iMovie on a Mac.
Step 1: Open iMovie, start a new project and select “Movie” from the list of project types.
Step 2: Go to “Photo Placement,” change the option to “Crop to fill,” and then adjust the Photo Duration to “0,1 seconds” by clicking the iMovie symbol located in the upper left corner of your screen under Preferences.
Step 3: Drag all of your photo series into the timeline after selecting “Import media” to import them.
Step 4: The file will need to be exported, then imported again so that the video may be sped up.
Step 5: You can click on the tiny speed meter symbol at the bottom of the screen after importing your saved file into iMovie once more and dragging it onto the timeline to speed it up like the time-lapse speed.
By following these steps, you can make time-lapse video iPhone, from a normal video and from a photo.
Wrapping Up
This is all about time lapsing in an iPhone and it is such a fun feature to try. We hope this article has provided you with information on how to make time-lapse video iPhone and what are the possible variations of time lapsing. For more such interesting and informative articles, check out us at Deasilex.
Frequently Asked Questions
Q1. How Long Are Time-Lapse Videos On iPhone?
Ans. On an iPhone, time-lapse videos can last up to 40 seconds, depending on how long the original video was. No matter how long you record, they won’t go above 40 seconds.
Q2. How Much Storage Do Time-Lapse Videos Take Up On iPhone?
Ans. Time-lapse recordings on the iPhone typically occupy between 40 and 100 MB, a significant reduction from standard videos. Even smaller hyperlapse videos are possible.
Q3. Can I Edit My Time-Lapse Videos On My iPhone?
Ans. Yes. You can clip, improve, and share your time-lapse videos using the Photos app’s video editing tools. iMovie and other video editing programs are also available.
Q4. How Many Frames Per Second Is iPhone Time Lapse?
Ans. Apple refers to these intervals as dynamically selected. As a result, the duration of every time-lapse photograph taken with the Camera app will always be between 20 and 40 seconds. It also requires fewer frames per second the longer you shoot.