

Live streaming is becoming a new trend for gamers. But streaming from the regular webcam and mic is usually not a good option. You have to use some software to provide better quality and features. OBS is one such software. Let’s find out how to stream to Discord with OBS studio.
Discord is a very popular platform for holding Discord servers for various games and companies. Mostly the servers are running open and anyone can join the server. Live streaming is one of the important features of this platform and it can be integrated with other software as well.
If you want to improve the live streaming quality, you can start streaming with OBS studio. It is free open-source software that can be used to improve the streaming quality of Discord.
We will be covering how to stream to Discord with OBS studio in detail. We have provided a step-by-step guide on how to stream to Discord with OBS studio for both windows and Mac. So, without wasting any more time, let’s start.
How To Stream To Discord With OBS Studio On Windows?
You can stream to Discord with OBS studio easily by completing the setup on the PC. Here is a guide on how to stream to Discord with OBS studio.
Step 1: Download the current version of the OBS studio by visiting obsproject.com.
Step 2: Install the software on your PC.
Step 3: Start the application and visit the OBS dashboard.
Step 4: Go to the sources tab at the bottom of the window.
Step 5: Click on the plus button.
Step 6: Then click on the video capture device once the pop-up list shows up.
Step 7: Click on create a new device.
Step 8: Confirm the webcam setup.
Step 9: Now launch the virtual camera in the devices options.
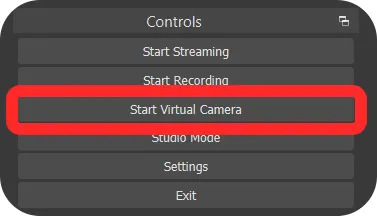
Step 10: Now you have to link the OBS virtual camera to Discord.
Step 11: Sign into your Discord account.
Step 12: Next, navigate to the settings.
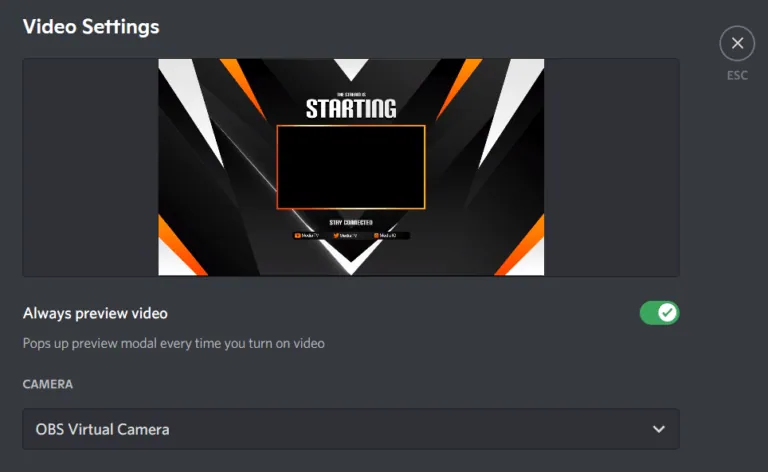
Step 13: Here you will find the voice and video options.
Step 14: Click on it and then select the test video and OBS virtual camera option.
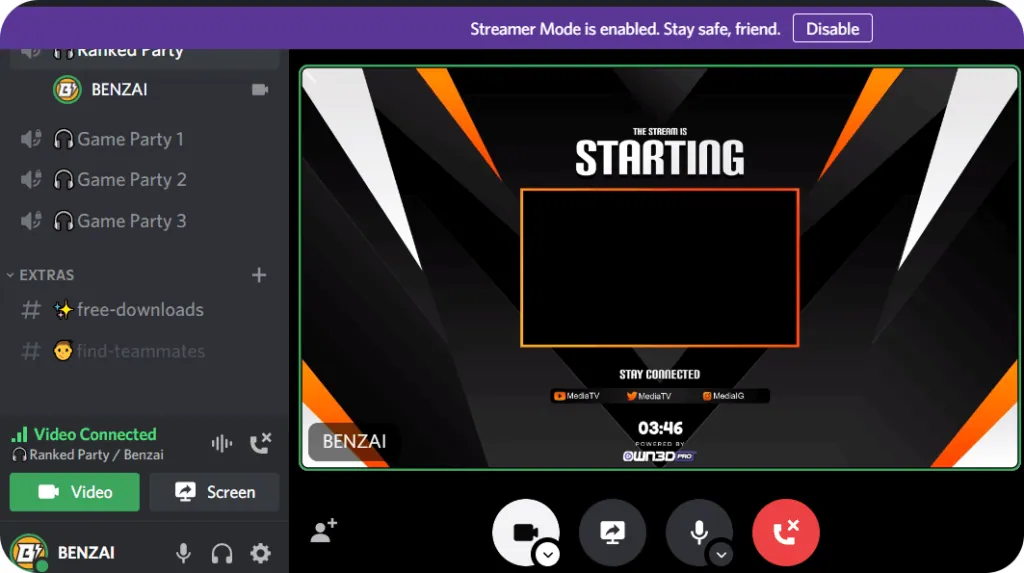
Step 15: Now you can start streaming to Discord with OBS studio.
How To Stream To Discord With OBS Studio On Mac?
If you have a Macbook, you can still stream to Discord with OBS studio. You have to set it up first and then you can start streaming. Here is a guide on how to do it.
Step 1: You have to visit obsproject.com and download the current version of the OBS studio.
Step 2: Install the software on your Macbook.
Step 3: Visit the OBS dashboard after starting the application.
Step 4: Go to the sources tab at the bottom of the window.
Step 5: Click on the plus button.
Step 6: Then click on the video capture device once the pop-up list shows up.
Step 7: Click on create a new device.
Step 8: Confirm the webcam setup.
Step 9: Now launch the virtual camera in the devices options.
Step 10: Now you have to link the OBS virtual camera to Discord.
Step 11: Sign into your Discord account.
Step 12: Next, navigate to the settings.
Step 13: Here you will find the voice and video options.
Step 14: Click on it and then select the test video and OBS virtual camera option.
Step 15: Now you can start streaming to Discord with OBS studio.
What Are The Features Of Using The OBS To Stream On Discord?
OBS is one of the best open-source software that helps in making live streams easier and more efficient. Apart from Discord, you can use OBS on other platforms as well. Here are some important features of the OBS.
- It is used for noise suppression and to improve the quality of audio.
- You can use it to add webcams and games for the tweaked stream layout.
- With OBS you can use an unlimited number of scenes and toggle.
- You can also arrange the screen layout as per your choice.
- With OBS virtual camera, you can share OBS scenes with apps that use webcams.
Wrapping Up
Here we conclude our post on how to stream to Discord with OBS studio. Enjoy high-quality live streaming with OBS studio integrated with the Discord app. You can have some more functions using this software while live streaming. If you find this post helpful, share it with your friends.
Frequently Asked Questions
Q1. How Do I Stream With OBS On Discord?
First, you need to set up OBS on your PC, then you can easily stream it on Discord or any other app. Visit the OBS dashboard after starting the application. Go to the sources tab at the bottom of the window. Click on the plus button. Then click on the video capture device once the pop-up list shows up. Click on create a new device. Confirm the webcam setup. Next, navigate to the Discord settings. Here you will find the voice and video options. Click on it and then select the test video and OBS virtual camera option. Now you can start streaming to Discord with OBS studio.
Q2. How Do I Stream To Discord?
Go to your Discord account and select the server where you want to stream. Click on the text or voice channel. Next share the screen and start the Discords streaming.
Q3. What Is OBS?
OBS is one of the best open-source software that helps in making live streams easier and more efficient. Apart from Discord, you can use OBS on other platforms as well.