Acer laptop not connecting to Wifi – we heard the cry out! Well, Acer laptop users are frequently facing the issue. However, it’s not about the brand name. There are complaints from other brand users too regardless of the age of the system.
Does your Acer laptop have WiFi connectivity issues frequent? There are numerous causes. You’ll undoubtedly experience this problem, for instance, if your laptop’s WiFi is deactivated, and Acer won’t connect to WiFi if your network adapter driver is damaged.
If you are an Acer user and facing a laptop not connecting to a WiFi issue, you are at the right place. This article walks you through possible 6 steps to address this immense problem.
Why Acer Laptop Not Connecting To WiFi?

The majority of the time, these issues arise after installing a recent router firmware update, a Windows update, or an antivirus update. However, there may be several more factors at play in your WiFi Acer laptop troubles. Several further concerns include:
- Wrong WiFi password or a recent router configuration change
- The laptop’s aeroplane mode is activated or broken.
- Windows or wireless driver corruption.
- Any malware, garbage, or virus on the system.
- Laptop overheating or a blocked Windows firewall
- Clash of IPs on the router
- Hardware problems exist with the network interface card in laptops.
- The power supply to the network card inside the laptop is being obstructed by the wireless driver.
- laptop with erroneous time and date
Related: How To Change The Keyboard Color On The iPhone?
How To Fix Acer Laptop Not Connecting To WiFi
Although we are certain that this article will resolve your wireless issue, we also know that you may have previously attempted a number of troubleshooting steps. Therefore, let’s begin with the most basic troubleshooting techniques to fix Acer laptop not connecting to WiFi issue.
1. Update Wireless Network Adapter

Your Acer laptop won’t connect to WiFi if your wifi network adapter is damaged or missing. You should upgrade your wifi adapter firmware to the most recent version in order to rule it out as the root of your network issue.
Your wifi adapter driver can be updated manually or automatically.
1. Update your drivers automatically: If you don’t have the time, Driver Easy can update your drivers for you.
2. Update your driver manually: Visit the website for your network adapter, look for the most recent wireless network adapter version there, download it to your laptop, and install it.
Your system will be instantly recognized by Driver Easy, which will then locate the appropriate drivers. You don’t have to be aware of the specific operating system that your computer is using, take the chance of downloading and installing the incorrect driver, or stress over making a mistake during installation.
The PRO and Free versions of Driver Easy allow you to automatically update your drivers. However, the Pro edition only 2 clicks and comes with a 30-day money-back guarantee in addition to comprehensive support:
Follow the steps below:
1) Get and set up Driver Easy (follow the instructions) 2) Start Driver Easy, then select Scan Now. After that, Driver Easy will check your computer for any problematic drivers.
3) To install the driver on your computer, hit the Update button beside the wireless network device. The driver will then be downloaded automatically (you may do this with the FREE version).
A request to upgrade will appear when you select Update All in the Pro version if you want to automatically download and install the proper version of all the problematic drivers.
4) Restart your computer after the update for it to take effect. Reconnect your laptop to WiFi now and test it to see if it functions properly.
Your problem is not resolved? Not to worry. Go on to the following strategy.
Related: How To Change Keyboard Light Color | Customize The Keyboard Backlit
2. Activate The WLAN Setting on Your Laptop
People who own newer laptop models can activate WiFi using a WiFi switch. So, if your laptop has a switch, try turning it ON to enable WiFi on your laptop.
Try turning on the WiFi option in Settings if you can’t see the WiFi switch on your notebook. This is how you do it:
1) On your keyboard, simultaneously press the Windows logo key and I to launch the Settings app.
2) Select Internet & Network.
3) Click the WiFi button on
4) Restart your Acer laptop and attempt a WiFi connection to see if it succeeds. If your laptop is still not connecting to WiFi, follow the next step.
3. Ascertain That the WLAN Autoconfig Service Is Active

The logic necessary to configure, connect to, discover, and disconnect from a wireless local area network is provided by the WLAN AutoConfig service (WLAN). All of the WLAN devices on your computer won’t function correctly if this service is disabled. Therefore, you should check to see that the WLAN AutoConfig service is functioning properly.
Follow these steps to do so:
1) To open the Run box, simultaneously hit the Windows logo key and R on your keyboard.
2) After entering services.msc, click OK.
3) Locate WLAN AutoConfig and double-click it (or Wireless Configuration on Windows XP).
Is the third step helped you to fix the laptop not connecting to WiFi issue? If not, the next step could bear your answer!
4. In Your Antivirus Software, Permit Wifi Connections
You should temporarily disable your antivirus software on your computer before attempting to connect to WiFi because your antivirus program can prevent your laptop from doing so.
If your Acer laptop is able to successfully connect to WiFi, the problem is with your antivirus program. In this situation, you must add your WiFi connection to your antivirus exceptions list and ensure that your WiFi connection is authorized by your antivirus software.
5. Reconfigure the Power Management Settings

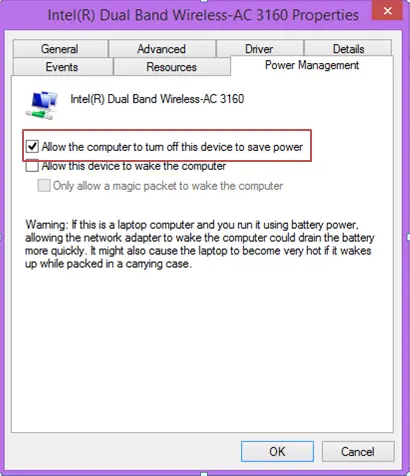
Your wireless network adapter’s Power Management options tie WiFi performance to battery life. Your wireless network adapter might be turned off by your Acer laptop when it needs to conserve power. Therefore, you want to review and adjust the Power Management settings.
1) To open the Run box, simultaneously hit the Windows logo key and R on your keyboard.
2) After entering devmgmt.msc, click OK.
3) Double-click Network Adapters in Device Manager, then right-click on your wifi network adapter and choose Properties.
4) Select the Power Management option, uncheck Allow the computer to turn off this device to save power, and then click OK. then press OK.
5) Power-cycle your laptop.
Now, check the WiFi connection of Acer laptop, if the laptop is still not connecting to WiFi then proceed to the next step.
6. Manually Connect to a Wifi Network
You can try manually connecting to WiFi on your Acer laptop if the solutions mentioned above didn’t solve your problem.
1) On your desktop, type “Control Panel” and click the Control Panel link that appears.
2) After clicking Network and Sharing Center, be careful to select “View” by Small Icons or “View” by Large Icons.
3) Select Create a new network or connection.
4) Decide Click Next after manually establishing a wireless network connection.
5) Enter the necessary WiFi data, such as the Network name, security key, and Security type. Before clicking Next, make sure the box that says “Start this connection automatically” is checked.
6) To complete the procedure, follow the on-screen instructions.
Wrapping Up
Now you are well aware of 6 methods to resolve Acer Laptop Not Connecting To Wifi. Try any or all of the above-mentioned strategies and I am sure that your problem will be fixed. Have more questions? Let us know in the comment box. Using a laptop other than Acer and facing the same issue? Let us know for the solution!
FAQs
Q1. How Do I Reset My Wifi On My Acer Laptop?
- To change the adapter settings, go to “Start > Control Panel > View Network Status and Tasks.”
- From the context menu that appears when you right-click “Wireless Network Connection,” choose “Disable.”
- To restart the adapter, wait until the wireless symbol goes grey, then right-click “Wireless Network Connection” and select “Enable.”
Q2. How Do I Get My Laptop Connected To Wifi?
- On the taskbar’s far right side, click the Network icon.
- When you are not connected, the Disconnected icon shows.
- Choose Manage Wi-Fi connections (>) from the Wi-Fi quick setting.
- Select the desired Wi-Fi network, then click Connect.
- After entering the network password, click “Next”.
Q3. Why Is My Laptop Not Finding My Wi-Fi?
Click Start, then choose Power > Restart. Restart your Surface, then log into Windows. Select Settings > Network & internet > Wi-Fi from the Start menu. Check to see if your wireless network is listed in the available network list by selecting Show Available Networks.

