
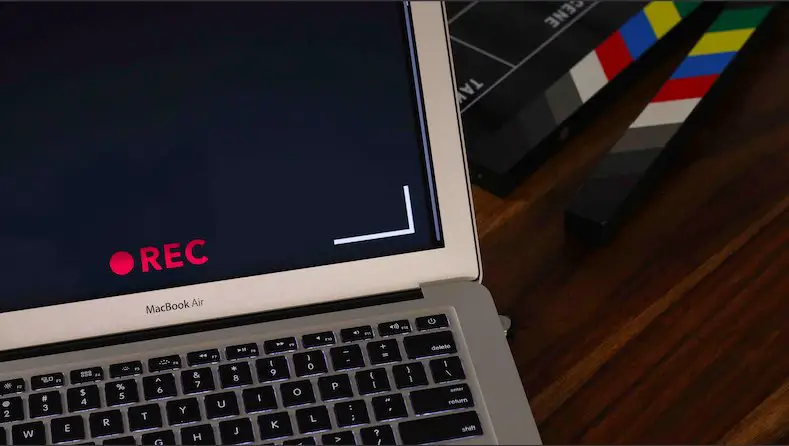
Do you want to save a video of what is playing on your screen? Do you want to share that with your friends or film it? Then, in such a case, you should know how to record your Mac’s screen as in this kind of situation it is very handy. However, Mac does have this in-built feature that will help you to record either part or your whole screen.
Moreover, you can even record the video with external audio. This means you can record anything that comes in through your mic. Unfortunately, you cannot record internal audio as Mac’s built-in options do not let you do this. So, if you want to record the internal audio then you need to download a third-party app, for example, Soundflower and EaseUS RecExperts. Although, you can turn on the external mic and turn up the volume this option will not give you good audio.
However, it is important you know that there are some apps like Apple’s built-in DVD Player that do not allow screen recording. In this post, we will discuss how to record your Mac’s screen. There are some easy ways by which you can record your Mac’s screen. You can use a QuickTime player to record your screen.
You can use QuickTime for all the versions of macOS up to Mojave. However, in the latest versions of macOS Catalina and Mojave, you will get a separate app that is called Screenshot. This will allow you to record your screen. So let’s get to know how to record your Mac’s screen.
How To Record Your Mac’s Screen Using QuickTime Player?
If you have Mac OS Mojave or an earlier version of it, then you can use QuickTime Player. With this, you can record your screen. Here are the steps that you need to follow to record your screen with QuickTime player.
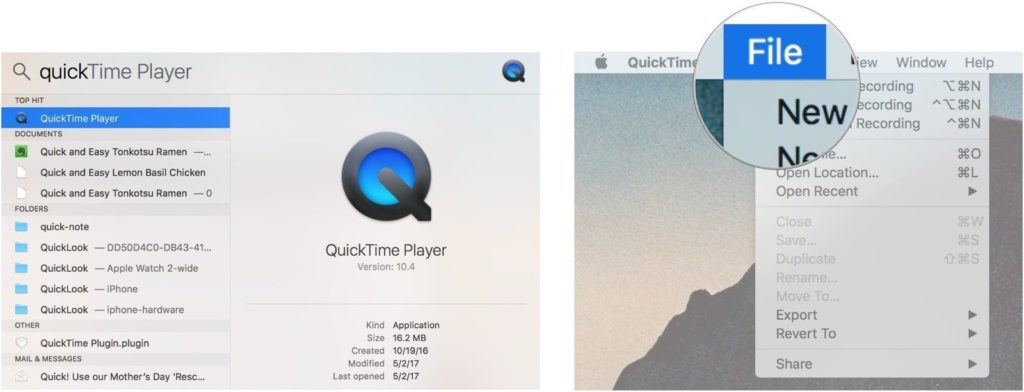
- Open the QuickTime Player.
- Next, you need to click on the File option. If QuickTime is in your doc, then you can click on the icon.
- Next select on New screen recording.
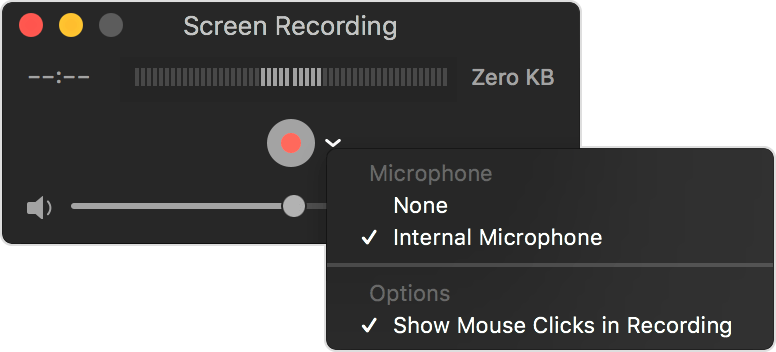
- You will get a popup window named Screen Recording.
- Click on the arrow next to the record button to get recording options.
- Next tap on the red record button.
- Click anywhere on the screen to record the whole screen.
- If you want to record a part of the screen then you need to click and drag the cursor to the window.
- Then in the middle of the window, you will see the recording start. Click on that button.
- If you want to stop recording you need to click on the stop button or press Command + Control + Esc.
- Now you can open the video to view and edit.
Also, check out Can You Screen Record Facetime – The Legal And Illegal Aspects
What Are The Benefits Of Screen Recording With QuickTime Player?
Now that you know how to record your Mac’s screen with a QuickTime player, here are some of the benefits that you need to know:
- Your Mac has QuickTime Player installed by default. So you need not spend any extra cost to install them.
- QuickTime Player provides extra features. These include features like recording video and audio.
- You can even use AirPlay or other sharing options instantly from your recorded video.
- You can get QuickTime Players on your Mac if it is running on an older version of macOS.
How To Screen Record On Mac With Screenshot Utility?
Recording your screen using the screenshot utility is perhaps the best and easiest way to do so. With this tool, you can easily record your screen and also take screenshots.
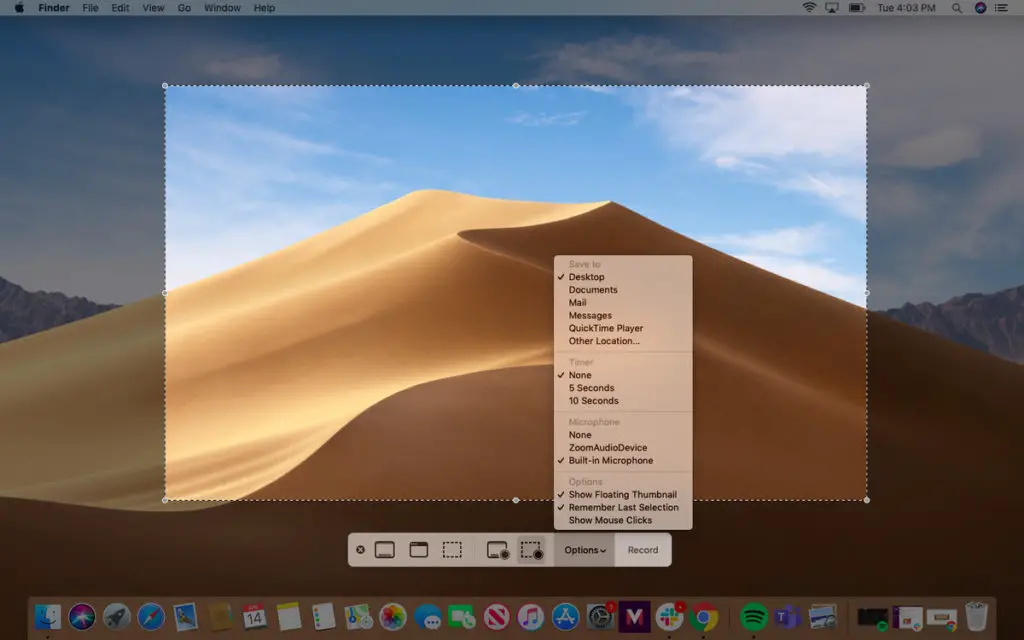
- Press Command + shift + 5 on your keyboard.
- You will see two options at the bottom of the window. These options are either to record the entire screen or record a selected portion.
- If you choose to record the entire screen then you will see a camera icon. This could be useful if you use more than one system
- Move the camera to the screen that you want to record. Then click recording to begin.
- If you choose to record the selected portion then you need to drag the corners of the box that you see.
- Then you need to adjust the size of the frame. You can even move the box to other areas on your screen.
- When you click on Option you will get to see different options for your Mac screen recording. This will also include selecting the microphone that you want. You can even choose the location where you want to save your recording and many other options are also available.
- Now that you are ready click on the record button to start screen recording.
You may also want to have a look at these 5 Best Free WebCam Recorders And Screen Recording Software!
How To Stop Screen Recording On Mac?
Now that you have completed the recording of your screen you can be confused about how you can stop screen recording. Since you won’t be able to see the screenshot utility in front of you. You should see on the top right of the macOS menu bar a small stop icon. You need to click on it and it will stop screen recording.
Similarly to stop recording your mac screen you can even press Command + Ctrl + Esc. Consequently, you can even press Command + Shift + 5, you will see a screenshot bar again with an option to stop recording. In these ways, you can stop screen recording. Moreover, the recording will be automatically saved on your desktop and you can preview it at the bottom of your screen.
What Are The Benefits Of Recording With Screenshot Utility?
Let’s talk about some of the benefits that you will get when you record your screen with the screenshot utility.
- The screenshot utility is a default feature of macOS. This means that you need not spend extra money on installing it.
- Some extra features include showing mouse clicks for tutorials, a built-in microphone for audio, timer for timed recording.
- You can even use AirPlay or other sharing options instantly for your recorded video.
Also, have a look at How To Screenshot On Windows 10 | 5 Easiest Ways To Do So!
Wrapping Up:
So these are some of the ways by which you can record your Mac’s screen. These are simple and easy to follow. Moreover, you even get to know about the benefits of using them. So you can use the above-mentioned methods and see how well they perform for you.
Frequently Asked Questions
Q. How To Record Audio In QuickTime Player On Mac?
Here are some steps that you need to follow to record audio in the QuickTime player on Mac.
- Choose a file in your QuickTime Player app. Then select New Audio Recording
- Tap on the Options menu and then choose any recording options: Microphone and Quality. If you have more than one then you can choose a microphone. You can even choose the quality of the recording.
- Next, adjust the volume control if you want to hear the audio that you are recording
- Click on the record button to start recording
- After you have finished recording then you can click on the stop button
- Next, select the file then click on save to save the recording and then name it. You can even choose a location where you want your recording to be saved.
Q. Can You Record Audio With QuickTime Screen Recording?
The quickTime player can actually record audio from your computer mic. This besides recording the surrounding sound will also record the computer audio. But the quality of the audio will be of lesser quality and will have a little delay. However, if you want a quick video then this will work great for you.