

Are your phone contacts synced to Facebook? Are you worried that this sync will clutter your phone contacts? Do not worry. You can opt to remove synced Facebook friends from the app.
Facebook is one of the most popular social networking platforms that is loved by its users for its user-friendly interface. It is accessed by millions of users every day, with 2.85 billion monthly active users, making it one of the most influential modes of social networking.
Facebook is designed to help the users to stay connected with their friends. To help the users to stay in touch even beyond the app, Facebook syncs the contacts of your friends to your device. Doing this will enable all users to participate in social networking even beyond the confines of the app.
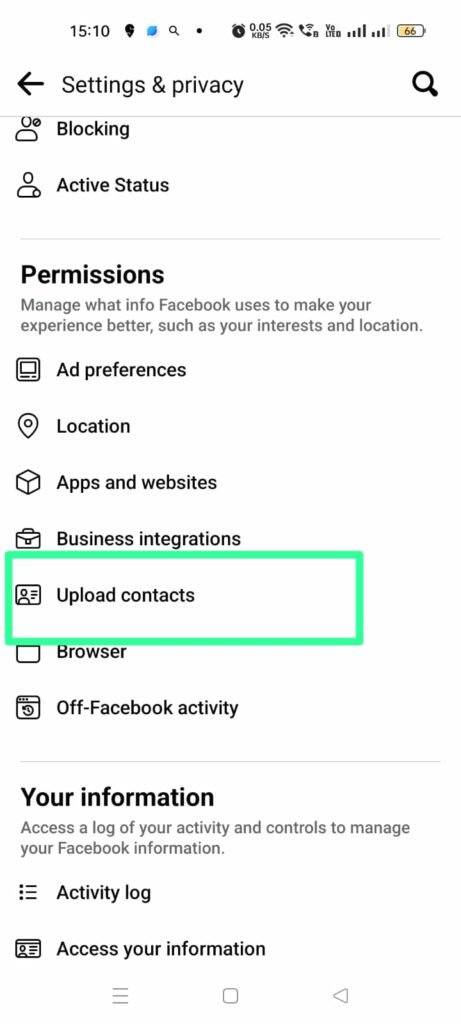
Click to open the Menu icon > Settings and Privacy > Settings > Permissions > Upload Contacts > Turn Off.
However, syncing your Facebook contacts could easily get out of hand. Especially if you have a large number of friends in your Facebook contacts. This will interrupt your phones’ contacts and also mess up the contacts saved to your cloud, disrupting your work. In this case, you can opt to remove synced Facebook friends from the app.
Let us see how to remove synced Facebook friends from the app for Android and iOS devices.
How To Remove Synced Facebook Friends From The App?
Facebook will automatically upload your contacts from your device, when the Upload Contacts option is turned on in your Facebook settings. Every time you log in to your Facebook account, the app will make updates to sync your Facebook friends contacts to your device.
Let us see how to turn off sync between Facebook friends and your phone’s contacts from within the app for
Related : How To Unsync Contacts On TikTok | 5 Easy Steps To Go!
1. Remove Synced Facebook Friends – Android Devices
Android device users can remove synced Facebook friends from the app by the following steps.
Step 1 – Open the Facebook app.
Step 2 – Login to your Facebook account.
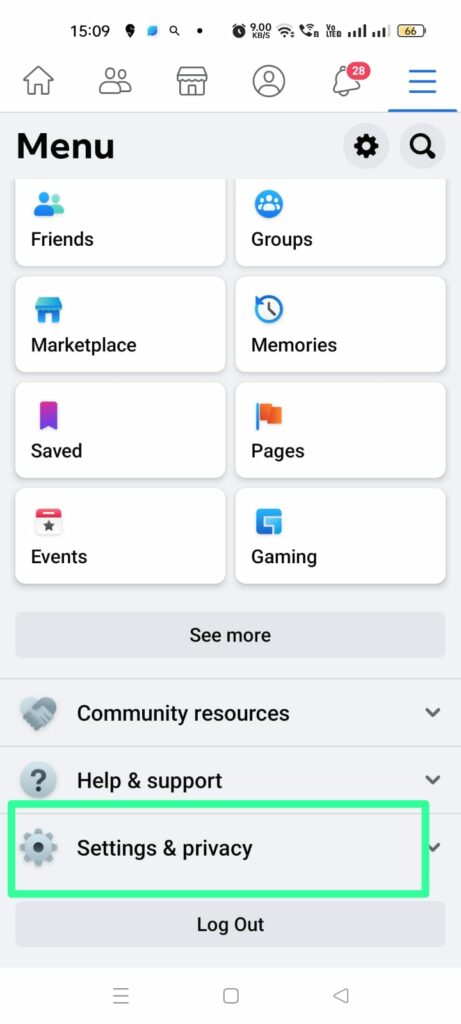
Step 3 – Click the Menu icon on the top-right corner of the app.

Step 4 – Scroll down and select Settings & Privacy.
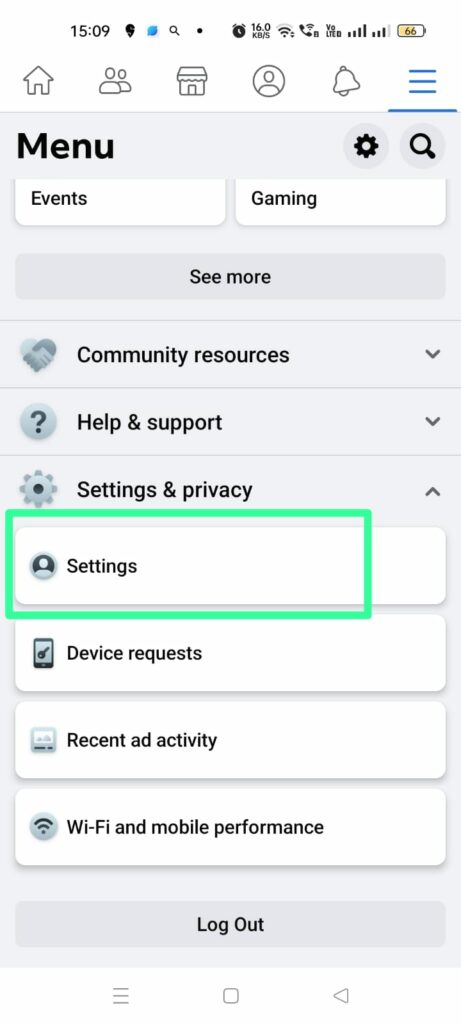
Step 5 – Click Settings.
Step 6 – Scroll down to Permissions.
Step 7 – Click on Upload Contacts.
Step 8 – Click the toggle near Continuous contact upload to turn off.
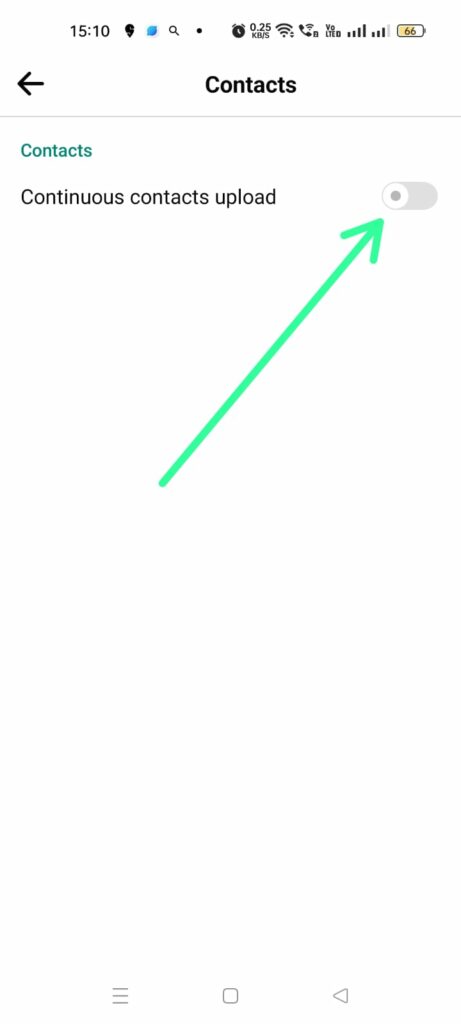
You have now turned off your synced contacts to remove synced Facebook friends from the app. This will alter your synced contact settings and also remove the friend suggestions that are based on your Android devices’ contacts.
2. Remove Synced Facebook Friends – iPhone
Apple enthusiasts can download Facebook on their iPhones and iPad. You can remove synced Facebook friends from the app by making changes in your Devices’ Settings.
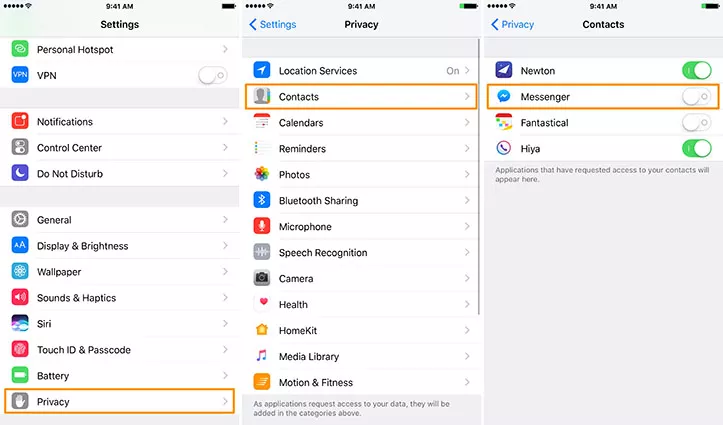
Step 1 – Click to open the Settings app.
Step 2 – Click on Privacy > Contacts.
Step 3 – Click the toggle near Messenger to turn off.
You can thus remove synced Facebook friends from the app, by changing your iOS device’s settings.
Related : How To Find And Sync Contacts On Instagram? Stay Connected With More Friends
3. Remove Synced Facebook Friends – iPad
Users who have signed into Facebook using their iPad can choose to remove synced Facebook friends from the app, by the following steps.
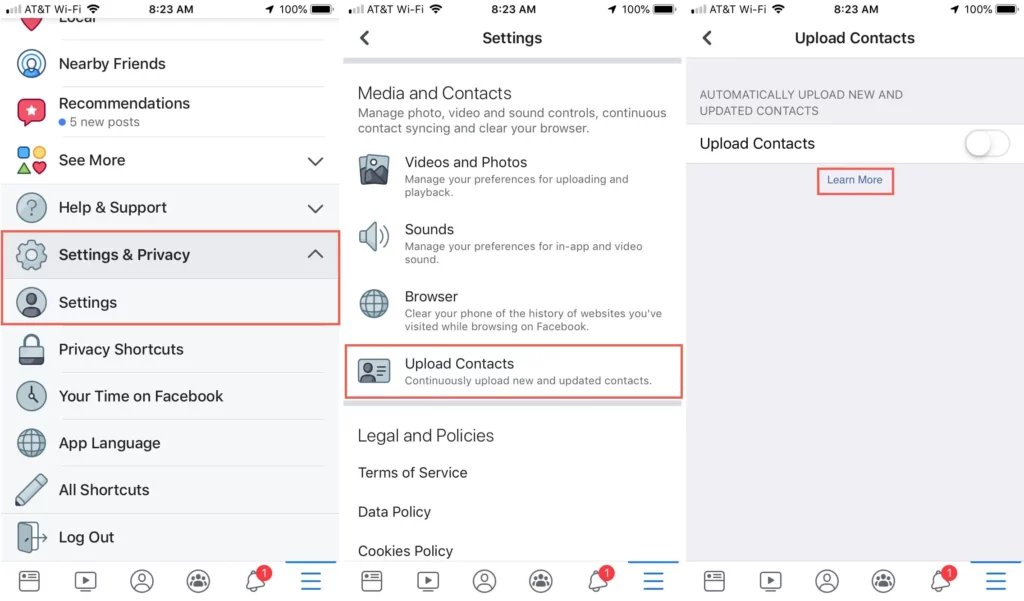
Step 1 – Open the Facebook app.
Step 2 – Login to your Facebook account.
Step 3 – Click the Menu icon on the bottom-right corner of the app.
Step 4 – Scroll down and select Settings & Privacy.
Step 5 – Click Settings.
Step 6 – Scroll down to Permissions.
Step 7 – Click on Upload Contacts.
Step 8 – Click the toggle near Upload Contacts to turn off.
You can thus un-sync your devices’ contacts from Facebook. You can choose to remove synced Facebook friends from the app, to stop the cluttering in your devices’ contacts and to save the iCloud space.
Facebook can sync contacts uploading only for iPhone, iPad and Android devices. If you are using Facebook on any other type of device, you will not have the issue of Facebook contacts cluttering your phone and worry about how to remove synced Facebook friends from the app.
Wrap Up
Facebook has the option to sync your phone contact to the Facebook app, so that it is easy for you to stay connected to your friends. This is plausible only when you are new to Facebook, and have a limited number of friends. As your friends list increases with time, you will not have to save each and every one of your Facebook friends to your phone’s contacts. If you want to remove synced Facebook friends from the app, you can easily do so by following the instructions given in this article.
Frequently Asked Questions
Q1 How Do I Delete Facebook Synced Contacts?
Step 1 – Open the Facebook app.
Step 2 – Login to your Facebook account.
Step 3 – Click the Menu icon on the bottom-right corner of the app.
Step 4 – Scroll down and select Settings & Privacy.
Step 5 – Click on App Settings
Step 6 – Click the toggle to disable Continuous Contacts Upload feature.
Q2 Can I Remove Synced Contacts?
Yes. You can remove synced contacts from your phone’s settings.
Open Settings > Accounts > Google
Go to your Gmail account that you want to remove the contacts from.
Click on the Menu and select the Gmail account to delete all contacts synced to that account are deleted in your device.
Q3 How To Remove Facebook Friends In Mass?
Step 1 – Open the Facebook app
Step 2– Log in to your account.
Step 3- Click on Account at the top right corner.
Step 4 – Click Edit Friends from the drop-down menu.
Step 5 – Select all the friends who you wish to remove.