

Today, with AI technology advancements, image generation is also possible using AI tools. You might have heard of one such tool named ‘Stable diffusion.’ But what is Stable Diffusion 2.1 Google Colab, and how to run Stable Diffusion on google Colab?
Stable Diffusion is one of the top artificial intelligence text-to-image generator tools. It is a text-to-image model that incorporates the use of natural language processing and machine learning algorithms to generate images from textual data. It can produce high-quality images resembling the images generated from DALL-E 2 and MidJourney, as it has been trained on billions of pictures. You can now run Stable Diffusion on Colab and change your thoughts into images.
To run Stable Diffusion on Google Colab, first, create a Hugging Face account or get Colab Pro and then open the Google Colab Notebook. Next, set the Hardware accelerator as GPU from the Runtime tab and then move to the File tab to save the copy of Stable Diffusion in Drive. Then, play all the snippet codes. At last, type the description for text-to-image generation and click the play icon to get the image.
Are you familiar with Stable Diffusion and want to run it on Google Colab? If yes, then you are at the right place. This article will give you a step-by-step guide for how to run Stable Diffusion on Google Colab using Hugging Face and Colab Pro and generate images from text in just a few steps.
How To Run Stable Diffusion On Google Colab?
Are you looking for a convenient way to run Stable Diffusion? You can use a cloud-based coding environment, Google Colab, to access Stable Diffusion using a computing environment with the necessary power.
There are two ways to run Stable Diffusion on Google Colab:
- Using Hugging Face
- Using Colab Pro
Let’s now move toward the next sections to learn the complete process to run Stable Diffusion on Google Colab using both of these methods and generate text-to-image. Continue reading!
How To Run Stable Diffusion On Google Colab Using Hugging Face?
To run Stable Diffusion on Google Colab using Hugging Face, create a Hugging Face account > Open Google Colab Notebook > Set GPU as Hardware accelerator > Save a copy of Stable Diffusion in Drive > Play all the snippets > Type text describing the image and number of images you want > Play the code.
Create An Account On Hugging Face
To create an account on Hugging Face, go to the Hugging Face website > Enter email and password > Next > Complete the profile > Create Account > Verify email.
You cannot run Stable Diffusion on Google Colab without a Hugging account. So, here are the steps for creating an account on Hugging Face:
Step 01: Go to the Hugging Face official website.
Step 02: Enter your email address and password and click on ‘Next.’

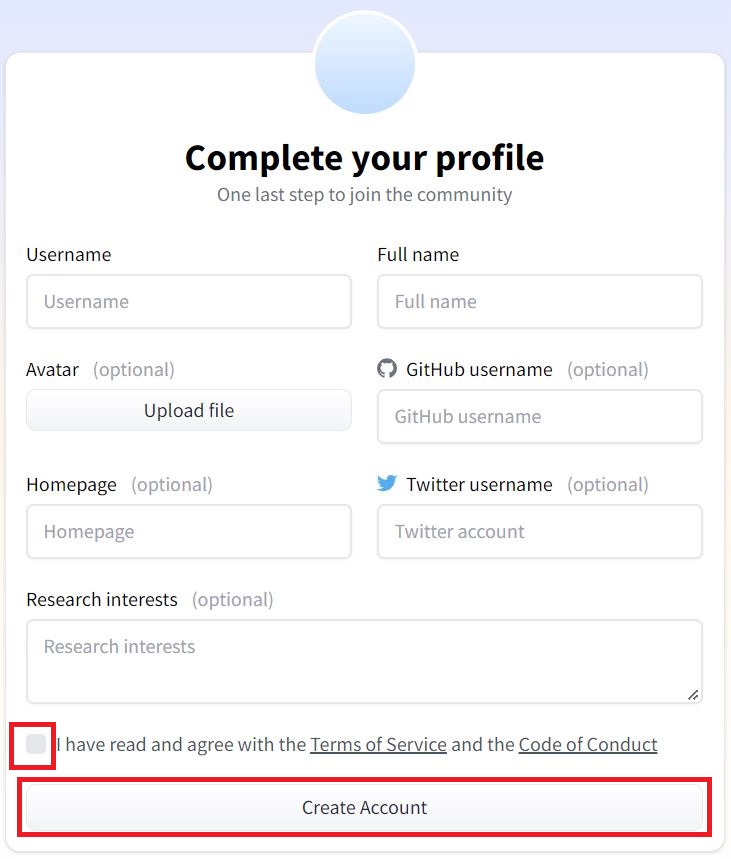
Step 03: Complete your profile, including the necessary details such as username and name. Check the ‘I have read’ box and click on ‘Create Account.’
Step 04: Open your email and click on the link available in the mail to verify your account.

Your account on Hugging Face has been successfully created.
Run Stable Diffusion On Google Colab Using Hugging Face Account
To run Stable Diffusion on Google Colab using Hugging Face account, Open Google Colab Notebook > Runtime > Change runtime type > Select GPU as Hardware accelerator > Save > File > Save a copy in Drive > Play icon next to first install code snippet > Play icon next to Hugging Face login > Link to generate token > Login to your Huggingface account > New token > Enter name and select role > Generate a token > Copy token > Enter Token code in Colab > Play icon next to ‘from diffusers import..’ > Play icon next to import mediapy > Type the image description in ‘prompt’ and the number of images in num_images > Play icon next to prompt.
Follow the steps below for running Stable Diffusion on Google Colab using your Hugging Face account to generate an image from the text:
Step 01: Open Google Colab Notebook.
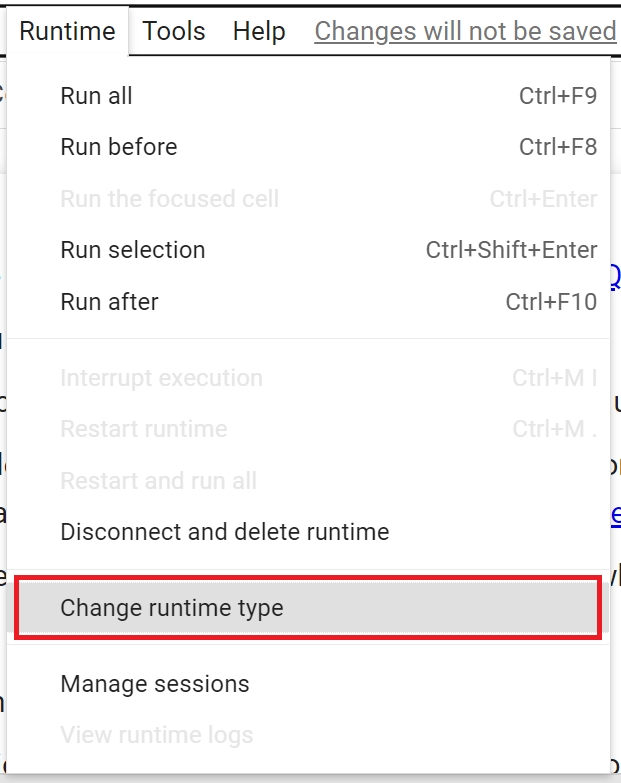
Step 02: Go to the ‘Runtime’ tab from the top navigation bar.

Step 03: Click on the ‘Change runtime type’ from the menu.
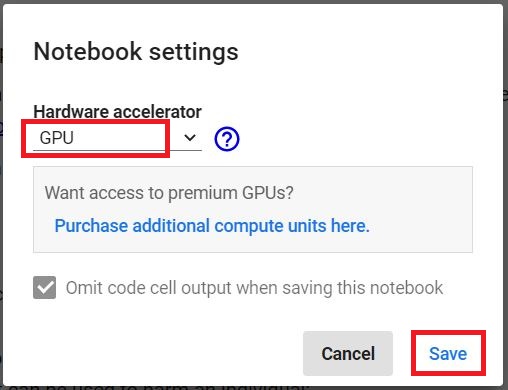
Step 04: Select Hardware accelerator as GPU from the drop-down menu and click on ‘Save.’
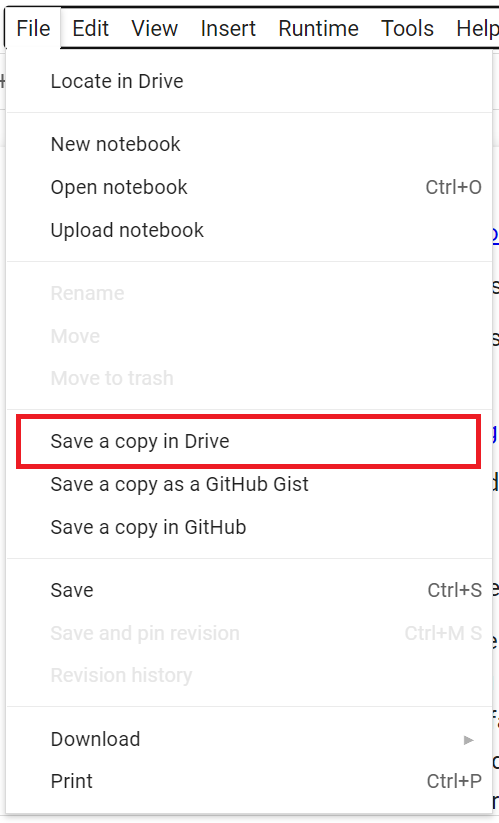
Step 05: Now, navigate to the ‘File’ tab.

Step 06: Click on ‘Save a copy in Drive.’ You will be redirected to a new tab, and you will now see ‘Copy of Stable_Diffusion.ipynb’ on top.
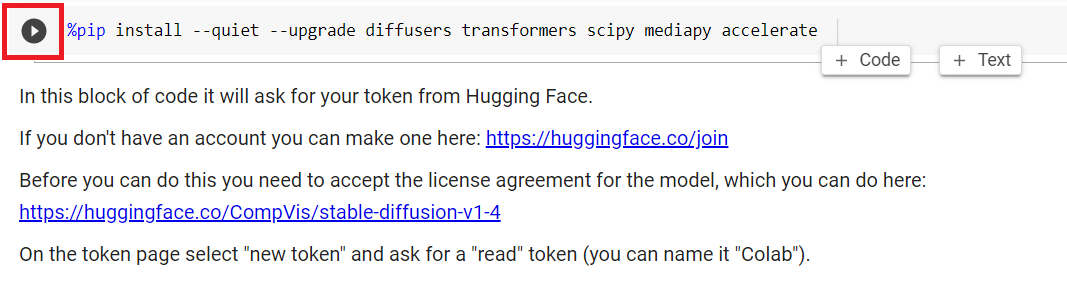
Step 07: Now, you must play all the code snippets one by one. First, click on the play icon next to the ‘first install code snippet’ and wait for the installation to complete.
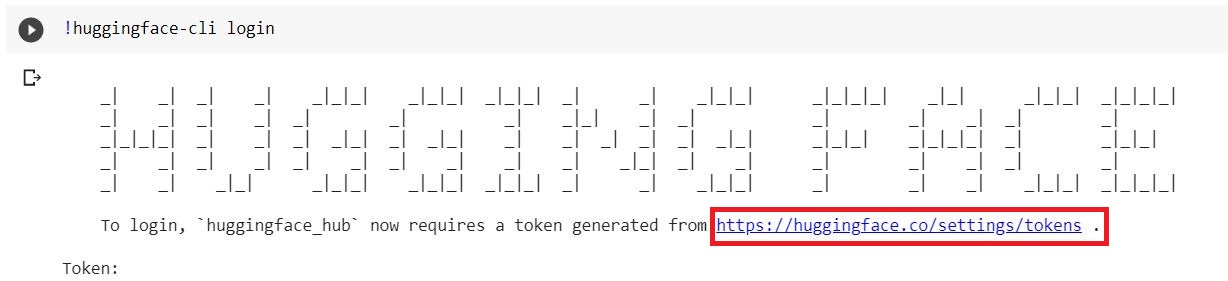
Step 08: Click on the play icon next to ‘Huggingface login.’

Step 09: You must now click on the link to generate the token.
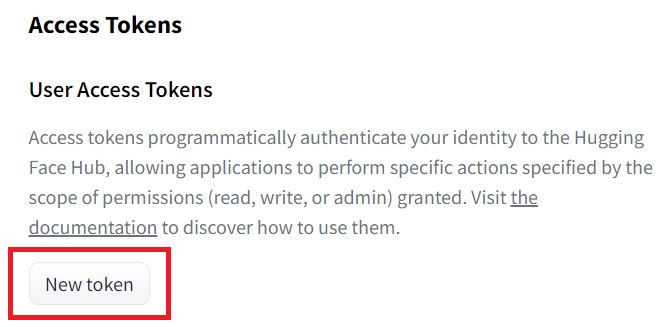
Step 10: Log in to your Hugging Face account using your login details and click on ‘New token.’
Step 11: Now, enter the token name, select the role and click on ‘Generate a token.’
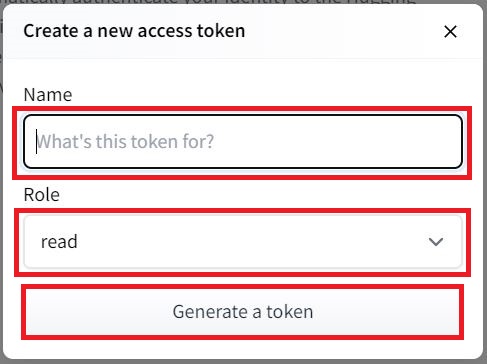
Note: Here, you must set the role as ‘read.’
Step 12: Click on the copy icon on the right end of the token to copy the token.
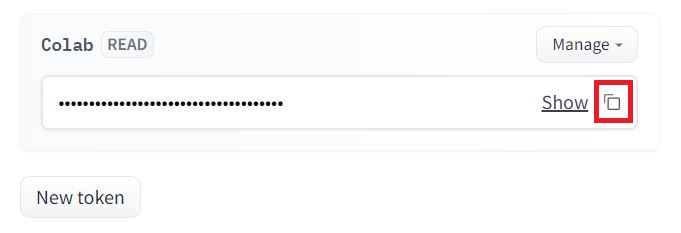
Step 13: Enter the token code in Colab and hit enter. If asked for ‘Add token as git credential?’, type ‘n.’
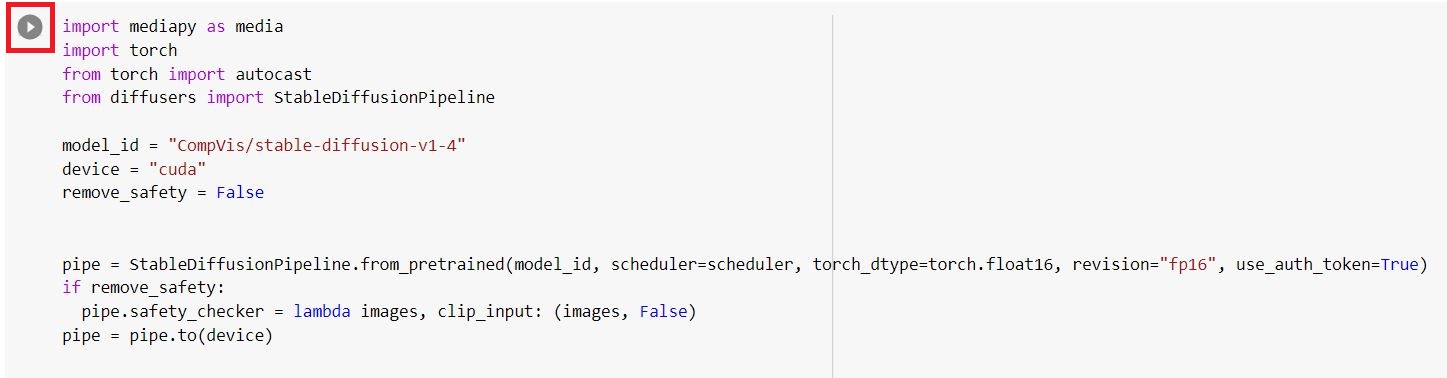
Step 14: Click on the play icon next to the ‘from diffusers import..’ snippet.

Step 15: Next, click on the play icon next to the ‘import mediapy as media’ snippet to download all the files.
Step 16: Now, your downloading process is complete, and you can type the image description in ‘prompt’ and the number of images you want in ‘num_images’ and click on the play icon to generate the image.
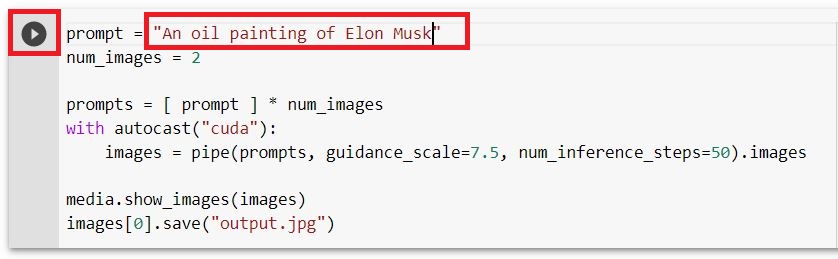
Step 17: Finally, the images are generated from the text and are on your screen.

Thus you have now learned how to run Stable Diffusion on Google Colab using Hugging Face account. Now, move to the next section to learn how to run Stable Diffusion on Google Colab using Colab Pro account. Keep reading!
How To Run Stable Diffusion On Google Colab Using Colab Pro?
To run stable diffusion on Google Colab using Colab pro, Open Google Colab Notebook > Runtime > Change runtime type > Set GPU as Hardware accelerator > Save > File > Save a copy in Drive > Down arrow next to ‘Setup’ > Play icon > Run anyway > Generating images with Stable Diffusion section > Type text description in ‘prompt’ > Down arrow next to generating images > Play icon > Down arrow next to downloading images > Play icon.
Colab Pro is required because the free version of Colab has too little VRAM to make photos.
Following are the steps to run Stable Diffusion on Google Colab using Colab Pro:
Step 01: Open the Google Colab Notebook.
Step 02: Click on ‘Runtime’ from the top navigation bar.
Step 03: Click ‘Change runtime type’ from the menu.
Step 04: Set the Hardware accelerator as GPU from the drop-down menu and click ‘Save.’
Step 05: Next, you have to navigate to the ‘File’ tab.
Step 06: Click ‘Save a copy in Drive.’ It will redirect you to the new tab and now see ‘Copy of Stable Diffusion.ipynb’ on top.
Step 07: Now, click on the down arrow next to ‘Setup’ to unexpand the section.
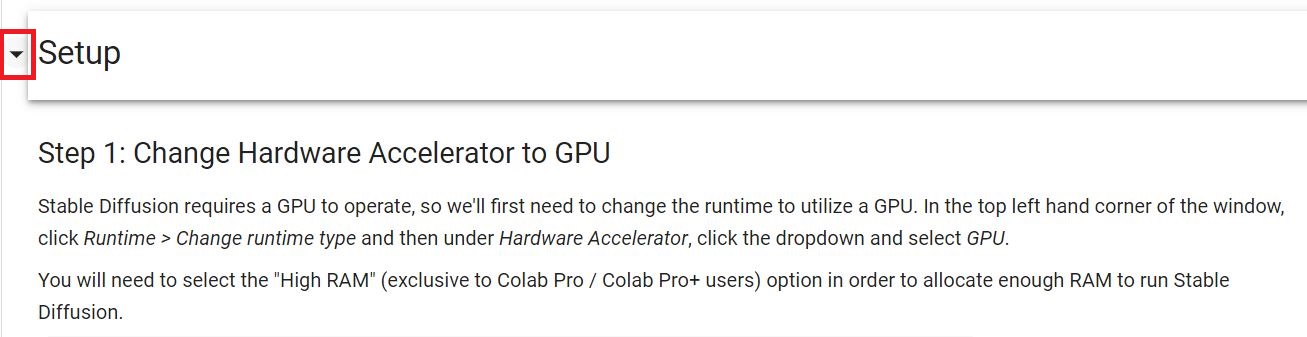
Step 08: Click on the play icon under the ‘Setup’ section to install and download all the files and repositories.

Step 09: If the popup displays, click on ‘Run anyway.’
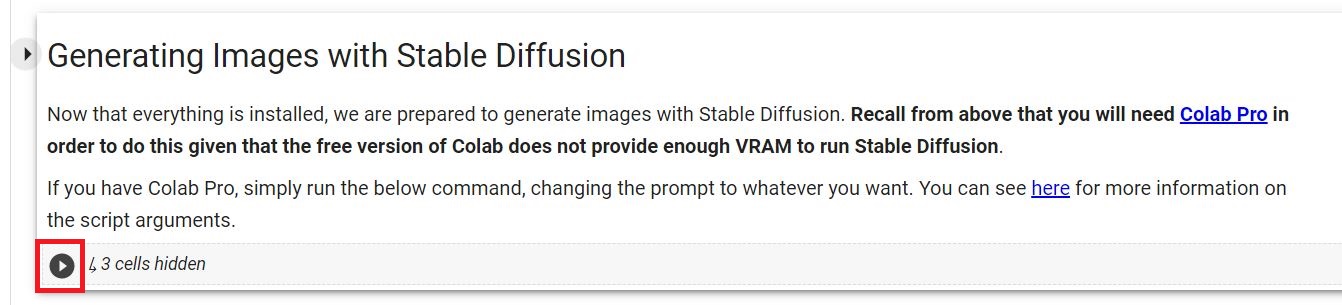
Step 10: Go to the ‘Generating images with Stable Diffusion section’ section, type the image’s text description, and click on the down arrow next to the same section to unexpand it.
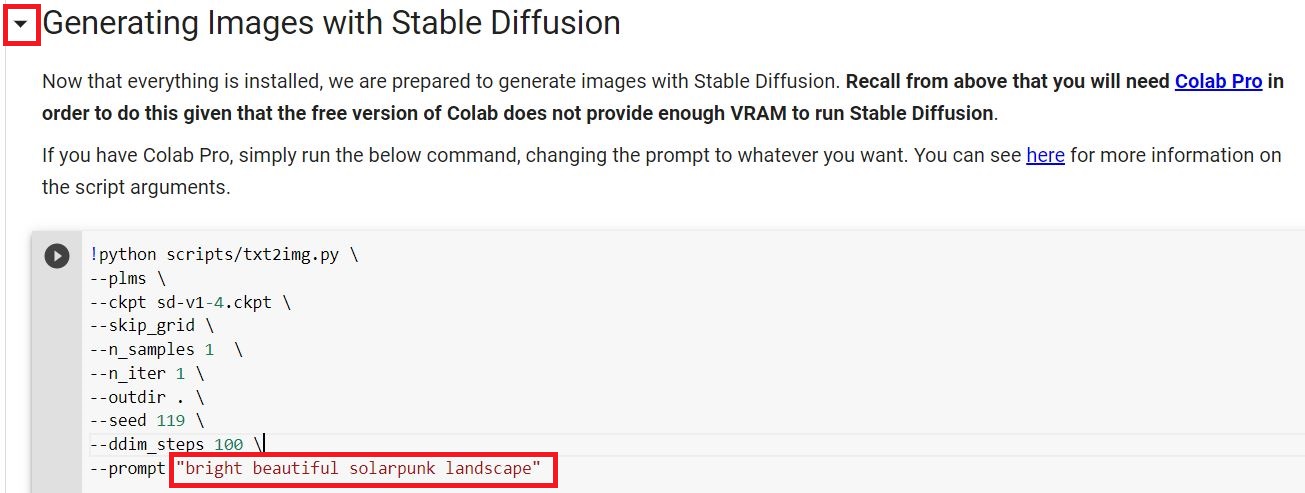
Step 11: Click on the play icon under the generating images section.
Step 12: To download the image, click the down arrow next to the ‘Downloading Images.’
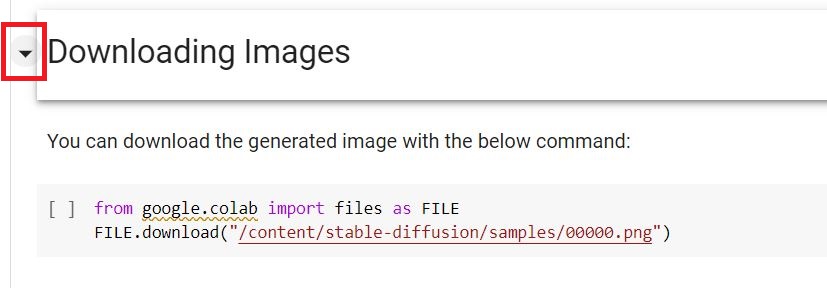
Step 13: Click on the play icon under the downloading section.

You have now successfully run Stable Diffusion on Google Colab using Colab Pro version and created your first image from text.
Wrapping Up
If you are looking for a way to run Stable Diffusion on Colab, this guide will surely help you. We have covered the complete steps for Stable Diffusion Google Colab. This article will teach you how to run Stable Diffusion on Google Colab. We have covered the Hugging Face account setup, Stable Diffusion setup, writing text prompts, and running Stable Diffusion commands. If you want more information on AI tools, keep following Deasilex!
Frequently Asked Questions
Q. How Do You Set Up Stable Diffusion On Colab?
To set up Stable Diffusion on Colab, Create an account on Hugging Face > Copy Stable Diffusion from Google Colab to your Drive > Check for Hardware accelerator for GPU > Run all the cells one by one > Download files.
Q. How Much VRAM Does Stable Diffusion Use?
Stable Diffusion uses a VRAM of 10 GB or more. To trade off model speed with less VRAM usage, users with less VRAM can load the weights in float16 precision rather than the normal float32 precision.
Q. Is Stable Diffusion Free?
Stable Diffusion is free and open source, unlike competing models like OpenAI’s DALL-E. Because of this, the tool may be rapidly improved.