
Have an urgent college or office assignment to submit and you can’t figure out how to move the inserted image on Google Docs? We know the kind of problem you might be facing! Are you unable to move the image freely? Is it so? Well! It’s a commonly faced problem with images on Google Docs. Here in this article, we have covered all the possible ways on how to move images in Google Docs freely.
Google Docs is a convenient, easy-to-use application where our files are automatically synced in the Google Drive. If you don’t personally delete your Google Doc file, then it’s bound to stay there for long. From drawing to sharing to online editing, everything seems like a piece of cake on this online Google suite application. Moreover, if you can’t find a possible solution for your problem in this application, trust us! It’s always in THERE!
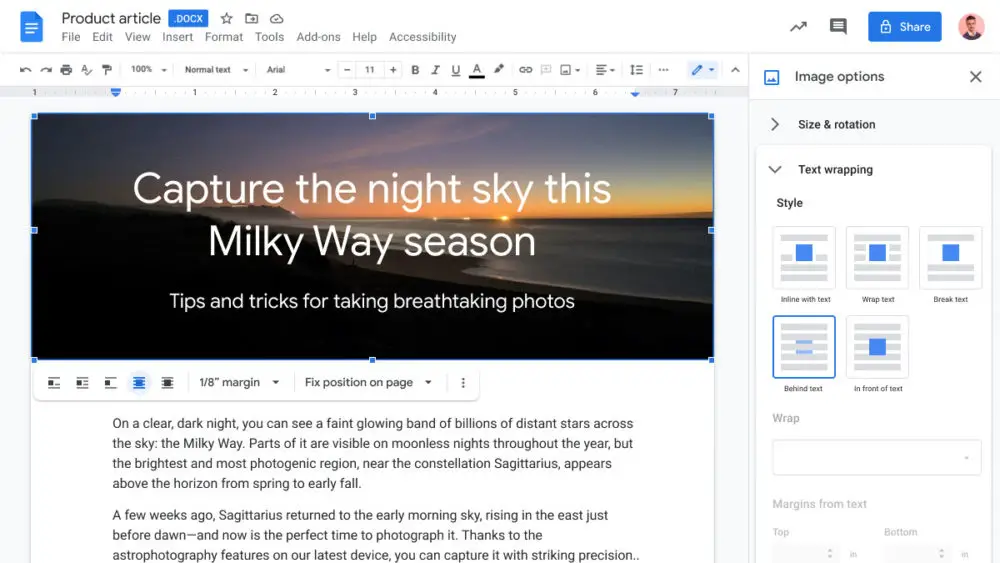
Don’t get frustrated if you can’t move the image on Docs. The answer lies in the application itself, to be precise, in the text wrapping options. Image editing options like “Text Wrapping” help us place our image in our Google Doc file according to our own convenience.
If you don’t know anything about text wrapping options or how to use them to move images in Google Docs effectively, then keep reading.
Working With Images On Google Docs
Who doesn’t like a nice illustration or image in a long text file? Everyone does, right? Images make documents more appealing and engaging and there’s no denying that. And let’s not forget how easy it is to do that!
You can add images in multiple ways in a Google doc and sometimes, you don’t even need a saved image in your Drive or computer to complete the job. Just clicking on “Search the web” makes the task of adding an image on Google Docs effortless.
In addition to the above-mentioned option, you can also select other ways to insert images in your Google Docs file. You can add an already saved image with other “Insert Image” options like “Upload from Computer”, “By URL”, “Photos”, “Camera”, and “Drive”. Moreover, you can also crop and edit the chosen image. (Google Docs is pretty convenient)
Although the editing options on Google Docs aren’t on par with other editing applications like Photoshop, nevertheless, it’s good to have something. Working with images on Google Docs is a nice experience.
Also Read: How To Flip An Image In Google Docs | 3 Simple Ways To Do It
How To Move Images In Google Docs?
If you’re just starting out, then here’s what you need to know besides the actual process of inserting images. Inserting images in Google Docs is easy, however, many people face issues with moving and placing images in it. Moving images in Google Docs is easy too if you are well versed in the image editing options like “Text Wrapping”.
Via Text Wrapping, you can place images anywhere on your desired location in Google Docs. Below is the curated list of ways and steps by which you can easily move images in Google Docs.
1. Move Images Via In Line Text Wrapping

The most simple and easy way of moving images in Google Docs is by dragging the image with your cursor by simply clicking on it. Dragging the image simply lets you text wrap it by default by the “In Line” text wrapping method. Here are the steps that will guide you to move an image by using this method.
Step 1: Open the Google Docs app or website on your browser and make sure you are logged in to your Google account.
Step 2: Select the Doc file to which you need to add images or make a new Doc altogether.
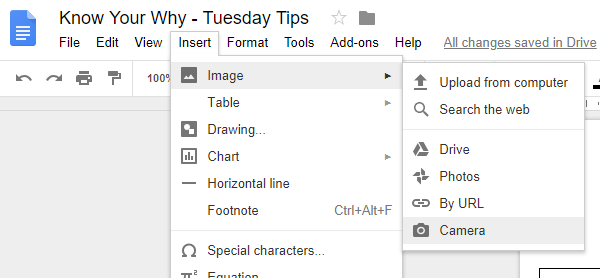
Step 3: Tap on the “Insert” tab on the top of the menu bar and then click on “Image”.
Step 4: Select an option from the row of options like “Upload from Computer”, “Search the web”, “Drive”, etc and add the image.
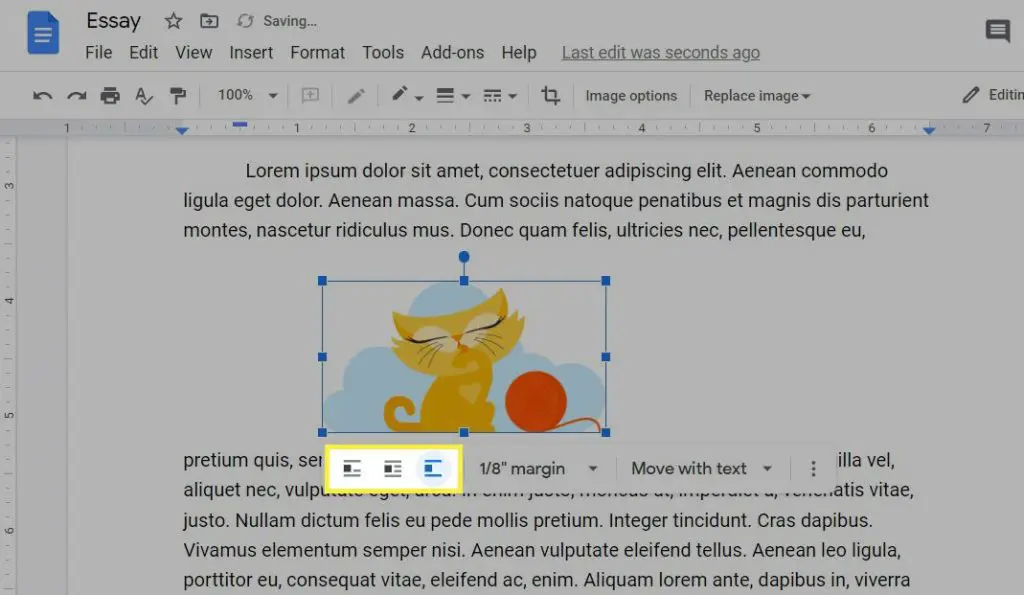
Step 5: Click on the added image and resize it according to your requirements by clicking on the resizing dots on the corners of the image. (You can also edit the image by right-clicking on the image and tapping on the “Image Options”)
Step 6: After editing, click on the added image again and hold it to drag. Drag the image anywhere on your Doc.
Once you follow these above-mentioned steps, you can drag and move your image anywhere on your Doc file. However, there are certain limitations to this method. You can’t freely place the image and every time you drag the image, it will be placed in front of the text. There’s a very important reason behind that.
By default, the image is placed in the “In Line with the Text” position. This means that your image is treated as a continuing word of the sentence you have written. If you don’t like how it appears, then you should follow other successful ways of moving images in Google Docs.
2. Move Images With Text Wrapping Via Wrap Text
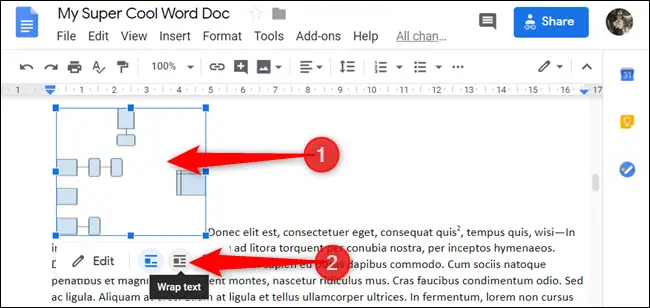
“In Line” isn’t the only option when it comes to moving images in Google Docs. Once you click on the inserted image, you will find other text wrapping options too, like “Break Text”, “Behind The Text”, “Wrap Text”, etc. In the row of options, click on “Wrap Text” to move your image effortlessly.
Here’s how you can move images with the help of wrap text and how it will appear!
Step 1: Open the Google Docs app or website on your browser and make sure you are logged in to your Google account.
Step 2: Select the Doc file to which you need to add images or make a new Doc altogether.
Step 3: Tap on the “Insert” tab on the top of the menu bar and then click on “Image”.
Step 4: Select an option from the row of options like “Upload from Computer”, “Search the web”, “Drive”, etc and add the image.
Step 5: Click on the image and resize it according to your requirements by clicking on the resizing dots on the corners of the image. (You can also edit the image by right-clicking on the image and tapping on the “Image Options”)
Step 6: After editing, click on the image again and then select the “Wrap Text” option below the image.
Step 7: Hold and drag your image however you like via the wrap text formula.
Wrap text lets you wrap the text around your image. No matter where you place the image, the text will automatically scatter around your image.
3. Move Images With Text Wrapping Via Break Text
Another way of moving images via text wrapping options is with the “Break Text” method. Break text will break the text in two different paragraphs top and bottom whenever the image is placed in between some written text. Here’s how you can move images in Google Docs via the Break text wrapping method.
Step 1: Open the Google Docs app or website on your browser and make sure you are logged in to your Google account.
Step 2: Select the Doc file to which you need to add images or make a new Doc altogether.
Step 3: Tap on the “Insert” tab on the top of the menu bar and then click on “Image”.
Step 4: Select an option from the row of options like “Upload from Computer”, “Search the web”, “Drive”, etc and add the image.
Step 5: Click on the image and resize it according to your requirements by clicking on the resizing dots on the corners of the image. (You can also edit the image by right-clicking on the image and tapping on the “Image Options”)
Step 6: After editing, click on the image again and then select the “Break Text” option below the image.
Step 7: Hold and drag your image however you like via the break text formula.
After you hold and drag the image via the break text method, all the text will be divided into two different paragraphs with your image placed in between.
Also read: How to Draw on Google Docs | Simple Google Hacks
4. Move Images Behind The Text
Want to set a beautiful background behind your text? Then why not place your image behind your text? This way you will get a beautiful background and you can even write your text atop it. Here’s how you can move the image behind the text in Google Docs.
Step 1: Open the Google Docs app or website on your browser and make sure you are logged in to your Google account.
Step 2: Select the Doc file to which you need to add images or make a new Doc altogether.
Step 3: Tap on the “Insert” tab on the top of the menu bar and then click on “Image”.
Step 4: Select an option from the row of options like “Upload from Computer”, “Search the web”, “Drive”, etc and add the image.
Step 5: Click on the image and then select the “Behind Text” option below the image.
Step 7: Hold and drag your image in the position you like.
In this method, you can skip resizing your image if you want the whole image as your background. Once you move and place the image with this method, your text will appear atop your image. (Isn’t it a cool way of decorating your project file on Google Docs?)
Wrapping Up
Moving images in Google Docs is pretty easy and convenient. With text wrapping options, you can move an image anywhere on your Google Doc file. You can use options like “In Line”, “Break Text”, “Behind Text”, “Wrap Text”, etc to decide the place of your image.
Moreover, you also fix the position of your image so that it doesn’t move anywhere from its already placed position. Options like “Move with the text” or “Fix on page” decide whether your image will stay fixed to its placed position or will it move with the text.
Frequently Asked Questions
Q. Why Can’t I Move Images In Google Docs?
To move images in Google Docs freely, you have to change your text wrapping options. Options like “wrap text” or “break text” let us freely move our images in Google Docs. To select these text wrapping options, click on the image and then tap on the suitable option in the row of options below. Once you have selected the option, you can hold and drag the image anywhere you like.
Q. How Do I Rearrange Images In Google Docs?
To rearrange images on Google Docs, make use of text wrapping options. Via Text Wrapping, you can place images anywhere on your desired location in Google Docs.
Featured Image Credits: Neowin