
This post briefs how to install fonts on Windows 11. You can receive the font file by yourself from the website or utilize Microsoft Store to find and install the latest fonts. We’ll also detail how to remove old fonts and make space for new ones. Have a look at amazing Windows features including the fonts!
Fonts are ordinary files, which can be installed from websites and can be exchanged between systems through CDs, flash drives, etc. There are multiple sites to install fonts online, involving costless sources like DaFont, Google Fonts, and FontSpace. Today we will learn Windows 11 owns its own in-built solutions to get fonts.
Wondering how to install fonts on Windows 11? And if you have already installed a font file in the OTF or TTF file, you cannot just keep it anywhere else in your system and use it. A font is not identified by Windows 11, and by extensive programs like Word and Docs until it is installed properly.
Installed fonts are kept in a particular folder, as detailed below. The below-given instructions will tell you how to install fonts on Windows 11 and will allow you to use the font in any program that seeks font files in the Windows Fonts Folder.
How To Install Fonts On Windows 11?
When you upgrade from the Windows 7, Windows 8, or Windows 8.1 operating system to Windows 10 or Windows 11, certain fonts are no longer available. But here’s the way to get your favorite font styles on your desktop!
1. Install Fonts From The Web

Here are the instructions for the further process after downloading the font file so that you can make use of the fonts in your programs :
- Place the font file.
- Extract the original file from the archive (if it’s there).
- Select it and enter the compressed folder tools.
- Then click on Extract All.
- Then select Extract the specific file you want to extract.
The file will appear in the folder by the exact name of the archive.
Also, read How To Create A Local Account On Windows 11?
NOTE: If your downloaded font files are in the archive, then it’s most probably a ZIP file. Although it’s another file like RAR or 7Z, you will be needing a third-party tool to extract the file. Once you extract the right file Outta archive, the remaining of these instructions will be applicable just as they do on ZIP font files.
- There are multiple tricks to downloading a font file in Windows 11. The simplest one is to double-tap on it, or click-right, and then tap on Show More options. In the next page you’ll see Install, click on it and you will have your file installed.
- You can also enter Settings from there go to Personalize followed by Fonts. After that drag down the file of the font into the Add font zone. This will work with multiple fonts too.
- Font can be downloaded directly from the Windows Font folder by C:\Windows\Fonts. Copy and paste each or multiple fonts to download them in multiple numbers.
NOTE: If not even one works of the given methods, cross-check if you are working with the authentic font or not. Try to shuffle the format of the file to a supportive one if it’s not identified by Windows 11.
Also, read How To View Wi-Fi Password In Windows 11?
2. Install Fonts Via Microsoft Store
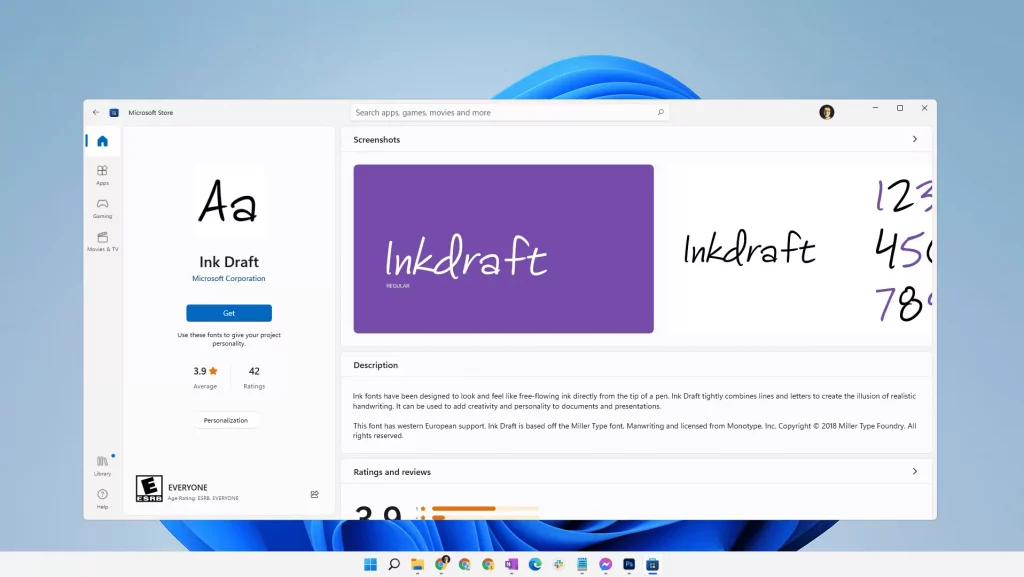
An alternative method to download fonts on Windows 11 is via Microsoft Store. Rather than looking for a trustable site to download fonts from, and then downloading the file on your own, Windows 11 has an inbuilt solution that eases the whole procedure.
- Enter Settings.
- Scroll and find Personalization.
- Click on Fonts. From here you will get a number of fonts in Microsoft Store.
- Select the font you want to download, and then tap on Get.
TIP: One more trick to enter Settings is to right-click the start button and choose it from the list.
How To Remove Fonts From Windows 11?

It’s simple to install custom fonts. It’s alright until you’ve built a huge pile of fonts that your programs are lagging while trying to load them all, or it’s becoming tough to manage all the functions. Then let’s resolve it by deleting fonts by the easy method :
- Go to settings by right-clicking the start button.
- Enter Personalization.
- Scroll through, you’ll find Fonts, click on it.
- Select the custom Font by scrolling or searching its name.
Another way to remove Fonts is a much better fix for removing fonts in bulk.
- Go to File Explorer.
- Select the Font(s) you want to remove.
- Then select Delete from the list.
TIP: You can use a font for sharing purposes or for backup if you tap right on a font or utilize the Organize menu option.
Wrapping Up
Windows 11 comes with a number of fonts, but it provides multiple methods for people who are not over the Times New Roman, Georgia, and Arial and don’t want to install their own. This can be specifically helpful for users who are fond of texts, graphics and also for developers and writers who are in love with exploring new fonts.
Fonts can be downloaded on Windows 11 via File Explorer, Settings, and Microsoft Store. Each option has its own perks and cons. The Microsoft Store is capable of downloading fonts in just a pair of clicks but brings fewer options. Whereas, Files Explorer and Settings need a little more effort in downloading fonts but can provide a huge bandwidth to download any font available in TrueType, OpenType, or PostScript files.
FAQs
Q1. How Can I Add Fonts To Microsoft Word?
Ans. Download the font on your device by the given manual above. There might be a chance that you have to close and reopen the program for the font to be visible.
Q2. What Is The Default Font In Windows 11?
Ans. Segoe UI is Windows 11 default font.